Wednesday, October 29, 2008

K2 November 2008 User Groups

Hey – there are two user groups for K2 and both are having meeting on Nov. 11. Both seem really interesting and you can attend virtually if you like.

  • Project Server Automation – very interested to see what can be done here…
  • Event Bus by the infamous Anthony Petro!

Also note that if you miss these, Chris Geier has been posting past user group presentations.

Denver K2 User group Home and Greater Texas User Group Home

The SmartObject intro I gave last month is posted on the Denver's User Group site.

Microsoft Project Server Automation Presentation

Many companies use Microsoft Project Server to assist in the management of complex projects of all sorts. However, often these complex projects need to follow customer specific processes around project creation, issue and risk management that Project Server doesn't provide out of the box. Using a Business Process Management suite such as K2 BlackPearl, customer project management processes can be automated so that the project owners and project managers can ensure that the correct policies are enforced and are auditable. Join this presentation to see how K2 BlackPearl was extended through its SmartObject technology to allow integration with Project Server 2007 and see demonstrations of how customers might use this type of integration.

Tim Knechtel has been with K2 for 4 years as a Technical Specialist working with customers and partners to help automate their business processes. Prior to working for K2 Tim worked at Microsoft for 9 years as a Technical Specialist focusing on Project Server, SharePoint and Exchange. With over 15 years of industry experience as a infrastructure specialist and software developer Tim enjoys getting software to work as the users would expect it to. In his free time Tim enjoys spending time with his family, playing hockey and running.

Meeting Agenda:
11-11:15 Networking/Refreshments
11:15-11:30 Announcements/Intros of New people
11:30-11:45 Tips & Tricks
11:45-12:45 Technical Presentation
12:45-1:00 Meeting Wrapup


For Virtual Attendees:

Note: please keep your phone on mute until you are ready to speak.

Audio Information

Telephone conferencing
Choose one of the following:

  • Start Live Meeting client, and then in Voice & Video pane under Join Audio options, click Call Me. The conferencing service will call you at the number you specify. (Recommended)
  • Use the information below to connect:
    Toll-free: +1 (888) 296-6500

    Toll: +1 (913) 227-1219

    Participant code: 224648

First Time Users:

To save time before the meeting, check your system to make sure it is ready to use Microsoft Office Live Meeting.
Troubleshooting
Unable to join the meeting? Follow these steps:

  1. Copy this address and paste it into your web browser:
    https://www.livemeeting.com/cc/scna/join?id=72G7CQ&role=attend&pw=W6M%23pHJ
  2. Copy and paste the required information:
    Meeting ID: 72G7CQ

    Entry Code: W6M#pHJ

    Location: https://www119.livemeeting.com/cc/scna

Event Bus Presentation

This month, Anthony Petro will present an introduction to the K2 Event Bus. The K2 Event Bus provides the infrastructure and tools to allow business users to model notifications and custom actions based on events in K2 workflow processes, SmartObjects, line- of- business (LOB) systems, and single or recurring schedules. The events are configured to evaluate and execute policies independent of the context of a workflow process or LOB system activity, such as a SmartObject Create method. The policies can range from simple e-mail notifications configured in the K2 Workspace to fully customized .NET code.


Anthony Petro is the Technical Product Manager for K2. He started his professional career in the consulting world 14 years ago and has always remained focused on Microsoft technologies and solutions. He joined Microsoft in 2001 and spent the next 5 years heavily immersed in SharePoint Joint Development Programs bridging the gap between the product development teams in Redmond and the enterprise customers around the world. He was a strong contributor to the SharePoint community in its infancy focused on teaching the masses about the complexities of search and enterprise scale and using products such as K2 filling the enterprise workflow gaps of SharePoint. He joined K2 in 2006 to help bring K2 blackpearl to market through early adopter programs that spanned the alpha and beta cycles through to RTM. Anthony remains actively involved in early adopter programs for K2 blackpoint and K2 connect and planning the future releases of all product lines.


Agenda:

6:00 - 6:15 Networking/Refreshments

6:15 - 6:30 Announcements

6:30 - 7:45 Presentation by Anthony Petro from K2

7:45 - 8:00 Meeting Wrap-up


Start Time:

Tuesday, Nov 11, 2008 6:00 PM MDT

End Time:

Tuesday, Nov 11, 2008 8:00 PM MDT

Occurrence:

Recurring meeting

Meeting Lobby:

Not enabled

Attendee URL:

https://www.livemeeting.com/cc/scna/join?id=CK6G4W&role=attend&pw=F59%3EKcr

Meeting ID:

CK6G4W

Attendee Entry Code:

F59>Kcr

Location:

Audio:

Two way computer audio conferencing: Off

One way computer audio broadcasting: Off

Telephone conferencing: On

Audio conferencing provider: Other

Toll free: +1 (913) 227-1219

Participant code: 994729


Friday, October 17, 2008

K2 blackpearl 0807 Update Installer

I received word that a bunch of new updates are now available for the 0807 build…

--------------------

We have release the Update Installer (KB000320 - K2 blackpearl 0807 Update (4.8210.2.320)) and is available on the Customer Portal for download. This Update will include all patches (hence forth known as Hotfixes) to date for K2 blackpearl 0807 and can be used to update on ANY version of K2 blackpearl 0807.


This first Update Installer contains the following fixes (documented in the corresponding Knowledge Base Articles):

Monday, October 13, 2008

Deploy InfoPath as a Feature

12/11/2009 - Update for Managed Code.

1.0 Introduction
For some time now I have been pretty unhappy with InfoPath deployment. I really did not know of a way to deploy InfoPath forms other than publishing them using the InfoPath Designer. I was even more frustrated with having to go to SharePoint Central Administration to deploy a form when I had to give the form Full Trust. Sometimes I had to give Full Trust to InfoPath sometimes for making data connections. As well, I would purposely avoid adding managed code at all cost to my InfoPath forms (still if I have to put in managed code into my InfoPath form, I should use ASP.net - InfoPath and ASP.net considerations).

Well someone made a comment to my blog which showed me the light – YES you can deploy an InfoPath form as a Feature. Awesome! Totally Awesome! Some may say this is old news, but I really just wanted to share the knowledge on this one.

I am excited about deploying InfoPath as a Feature for the following reasons:

  • The InfoPath form will be deployed as a content type. I have many scenarios where I have to publish an InfoPath form to many form libraries. For instance I have business process where the InfoPath form will be initiated in one Form Library and archived in a different one. Now I do not have to go to each form library and redeploy. Since it is a content type that will be added to a Form Library, when I redeploy the form with updates, all of the form libraries are updated.
  • The form gets installed into Central Admin requiring me less clicking and less steps.
  • I can now automate the deployment of my InfoPath forms and package them up in .wsp!!! That is really where I wanted to get to.

2.0 Feature
Getting to the fun stuff first, the following is a feature that will deploy your InfoPath form for you.

2.1 Feature file

<?xml version="1.0" encoding="utf-8" ?>
<Feature xmlns="http://schemas.microsoft.com/sharepoint/"
Id="DE7C8197-4FF3-41f5-B13A-6ACB94FA0C77"
Title="New User Request Form"
Description="This feature deploys the browser enabled New User Request InfoPath Form."
Version="12.0.0.0"
Scope="Site"
DefaultResourceFile="ipfscore"
ReceiverClass="Microsoft.Office.InfoPath.Server.Administration.XsnFeatureReceiver"
ReceiverAssembly="Microsoft.Office.InfoPath.Server, Version=12.0.0.0, Culture=neutral, PublicKeyToken=71e9bce111e9429c" >
<ActivationDependencies>
<ActivationDependency FeatureId="C88C4FF1-DBF5-4649-AD9F-C6C426EBCBF5"/>
</ActivationDependencies>
<ElementManifests>
<ElementManifest Location="element.xml"/>
<ElementFile Location="NewUserRequestForm.xsn"/>
</ElementManifests>
</Feature>
2.2 Element File


<?xml version="1.0" encoding="utf-8" ?>
<Elements xmlns="http://schemas.microsoft.com/sharepoint/">
<Module Name="XSN" Url="FormServerTemplates" RootWebOnly="TRUE">
<File Url="NewUserRequestForm.xsn"
Name="NewUserRequestForm.xsn"
Type="GhostableInLibrary"/>
</Module>
</Elements>


Notes:

  • The key to this whole thing is the receiver class XsnFeatureReceiver.
  • In the Feature File the Enterprise Feature is turned on by creating an activation dependency on C88C4FF1-DBF5-4649-AD9F-C6C426EBCBF5.
  • The name of the InfoPath form is an ElementFile in the Feature.xml and is a Module in the Element.xml.

3.0 Create Project
The following is what I had to do create a project for the InfoPath form.


3.1 Visual Studio

  • I created a Visual Studio C# project. Yes, I still believe in being able to do some of this stuff from scratch.
  • In the project I added a TEMPLATE, FEATURE and a feature Folder called K2Distillery.IP.NewUserForm. In the Feature folder I put the element.xml and feature.xml. The InfoPath form will be published to Feature Form later. I explain why I do this a little farther down.
  • In the project, I deleted the default class that was created and I added the InfoPath form into the root of the project.
  • I created a file called WSP.ddf in the root of the project. This will be used to create a solution package to deploy and InfoPath Feature.
  • I then finally added a manifest.xml file to the project.
  • In the properties of the project, in the Post Build Events, I added the following which will create my deployment package when the project is built:
    cd $(ProjectDir)
    MakeCAB /D outputDir=$(OutDir) /f "WSP.ddf"

The following is what the project solution looked like when I was completed.


3.2 manifest.xml File
The manifest.xml file is used by the WSP solution package to deploy the Feature.


<Solution xmlns="http://schemas.microsoft.com/sharepoint/"
SolutionId="F9D4D78A-06AA-4625-9676-0A27E6299E05">
<FeatureManifests>
<FeatureManifest Location="K2Distillery.IP.NewUserForm\feature.xml"/>
</FeatureManifests>
</Solution>

3.3 WSP.ddf File
This file is used create the WSP file that will be deployed into SharePoint. The great thing about doing this is if there are other Features I need to deploy along with this InfoPath Form Feature, I can package them up in this single solution and all of the files will be deployed across the entire farm. For instance, if I really want to get slick, I could create a different feature to create a Form Library and then write a Feature receiver to get the content type for the InfoPath form and associate it to the Form Library on the fly.


I highly recommend that you get into this habit. It is not that hard once you learn it.

.OPTION Explicit
.Set CabinetNameTemplate="K2Distillery.IP.NewUserForm.wsp"
.Set DiskDirectory1="C:\K2Distillery\IP\K2Distillery.IP\K2Distillery.IP.NewUserForm"

manifest.xml

.Set DestinationDir="K2Distillery.IP"

.Set DestinationDir="K2Distillery.IP.NewUserForm"
TEMPLATE\FEATURES\K2Distillery.IP.NewUserForm\element.xml
TEMPLATE\FEATURES\K2Distillery.IP.NewUserForm\feature.xml
TEMPLATE\FEATURES\K2Distillery.IP.NewUserForm\NewUserRequestForm.xsn

.Delete outputDir

4.0 Deployment Steps
The next step is to deploy the solution. I have two steps.

4.1 InfoPath Deployment
You may have noticed in my project I have the InfoPath form in the root of the project and in the Feature folder. You will see what I did this in a moment.

  • Open the InfoPath form in the root of the project in InfoPath Designer.
  • Select File >> Publish:
    • To Network Location
    • In the next step, navigate to the \\TEMPLATE\FEATURES\K2Distillery.IP.NewUserForm folder.
    • In this step of the publishing process, clear this text box and press the Next button. This is the reason why I have two different copies of the InfoPath form in the project. The first one is the Form I make modifications to and the second one is the form that will actually be deployed to MOSS.

  • Then Finish the wizard and close InfoPath.

4.2 Solution Deployment


  • Since the manifest.xml and WSP.ddf files have been added to the project and I have added Post Build commands to generate the WSP file, the only thing I need to do is build Project. Easy.
  • Once the project has been built a file called K2Distillery.IP.NewUserForm.wsp should have be created. The location of it is in the WSP.ddf file.
  • Then all I need to do is deploy this using stsadm.exe:

stsadm.exe -o addsolution -filename C:\K2Distillery\IP\K2Distillery.IP\K2Distillery.IP.NewUserForm\K2Distillery.IP.NewUserForm.wsp

stsadm.exe -o deploysolution -name K2Distillery.IP.NewUserForm.wsp -immediate -force


stsadm.exe -o execadmsvcjobs


  • Then finally I need to activate the Feature on the site:

stsadm.exe -o activatefeature -filename K2Distillery.IP.NewUserForm\feature.xml -url %SITEURL% -force

All of these steps could have been done through Central Administration and in Site Settings however, going down this path you will be able to create one touch deployment command files that can deploy your entire solution into a production environment.

4.3 Verifying Deployment
There are several places for you to verify that everything went well:

  • Go to Central Administration and you will see that you form has been added there.
  • Go to the site/FormServerTemplates/ and you will see the form there.
  • Go to Site Settings and you should find a new Content Type called NewUserRequestForm has been created. The InfoPath form will be set up as the document template for the Content Type.

4.4 Adding the Form to a Form Library
It is pretty common knowledge on how to add Content Type for a List, Document Library or Form Library. Well the steps have not changed. Create a Form Library, go to the form settings, go to advanced settings, allow management of content types and then add the content type for the form to the Form Library.

4.5 Promoted Fields
If you are wondering where are the Promoted Fields? Well they are there, however they are not added as a column to the Form Library when you associate the Content Type. At first I did not know where they were because I was accustomed to having promoted fields added as columns of the Form Library automatically because when I publish a form using InfoPath Designer. To add them, all you need to do is:

  • Go to the Form Library settings.
  • Scroll down to the Views section at the bottom.
  • Click on a view.
  • Check the promoted InfoPath form field which will be listed as a column. That is it.

Yes, I could probably create another Feature to do this for me too, but at this point, I need to move on J

4.6 Managed Code
Read the following posting I wrote after writing this blog.

5.0 Conclusions
Some may say you had to do just as much effort, if not more, to deploy the solution in this manner versus deploy the form using InfoPath Designer or through Central Administration. It really comes down to following a true publishing model with SharePoint. Many say if you cannot deploy something as a Feature it should not be deployed at all. I agree with this sentiment in many respects (and why I avoid using SharePoint Designer). I do agree there is a point where some manual configuration is required to deploy between SharePoint environments.

References
Deploy InfoPath Form as a Feature – Yes, I had a little help here J

Wednesday, October 1, 2008

MOSS State Workflow Email Escalation Part 2

Scenario


The scenario I have is that I have a state workflow that I am building in Visual Studio and deploying to MOSS. In this human workflow I need to incorporate the concept of raising an escalation email event so when a user has not completed a task in a period of time. I was doing an early proof of concept and found issues with DelayActivity requiring me to install a hotfix. Well I thought I would have everything working and it would be really simple to just throw on an email activity after the delay activity. However I was terribly wrong.


Design


I was basically following a simple pattern where I would add two event driven activities, one that would wait for an action to be taken on the task, and another where a delay activity would wait for a period of time to pass.

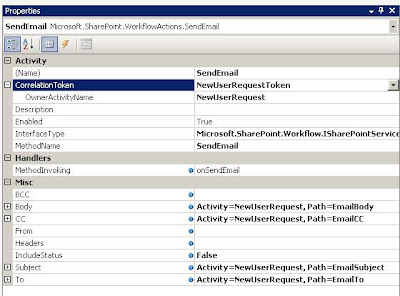
Here is what I had for the escalation. Basically after a period of time the delay would end, an email would be sent and then a log would be made. Hey that should be simple?
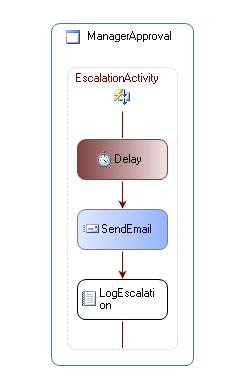
Error Message

At first, I was getting no error messages; nothing in the ULS logs and nothing in the event viewer. Then after doing some playing around I noticed if I disabled the email activity everything would work. So I something was wrong there.

After playing with it a bunch more and I started to get "The e-mail message cannot be sent. Make sure the outgoing e-mail settings for the server are configured correctly." in the workflow log. This was extremely annoying because emails are working in task lists and other places throughout the workflow the SendEmail activity was absolutely working, just not in my escalation.

Well there were numerous things going wrong with using the EmailActivity. After doing some searching I saw that many had given up and just used SPUtilities.SendEmail() or just wrote their own wrapper to use System.Net.Mail but to tell you the truth the SendEmail activity was MOCKING ME. I know that there must be a way to send an email.

Resolution

I was able to find out some of this has to do with the way DelayActivity worked with MOSS and specifically state workflows. All of the issues I was experiencing would not occur in a sequential workflow. When configuring a SendEmail activity that occurs after a DelayAcitivty you need to make sure the it is configured correctly.


A few notes:

  • The CorrelationToken must be correctly set. It is possible that you may have many tokens in your workflow. You will have on for the token for the WorkflowActivated activity and you may have a different tokens tied to the CreateTask activity (such as my case). Make sure you use the token that is from the WorkflowActivated activty. Otherwise you will get no errors and the workflow will throw an error into the log and give you no information.
  • If you are trying to set any of the properties of the SendEmail activities in code, stop as you will run into tons of problems. Check out the references below. What you will need to do is create new workflow properties and bind to them like the above screenshot. Then in an event handler you can set the values. If you create an event handler and then try to set SendEmail object directly none of the values will be set and you will get an empty email throwing errors.
  • Finally in the code of the onSendEmail event handler, you will have limited access to data. I was not able to narrow down why this is occurring (partly because I just do not care anymore). For instance, you may want to put the title of the task into the body of the email. So you may have a SPWorkflowTaskProperties object where you will want to get this data from. Well, I was getting ton null exceptions when trying to do this. I did find that I could use the SPWorkflowActivationProperties and that was good enough at this point.

The following is some code from the onSendEmail handler. Here you will see where I set the attributes I have bound to the SendEmail activity. You will see that I have an object that I use to get data from the InfoPath that is being routed around (beyond scope of this blog entry).


private void onSendEmail(object sender, EventArgs e)
{
this.EmailTo = _infoPath.ManagerEmail;
this.EmailSubject = "Reminder - New User Request Task";
this.EmailBody = "A New User Request for " + _infoPath.FirstLastName +
"was assigned to you but not completed. " +
"Please go to the following Task list to complete your assigned task: " +
NewUserRequestWorkflowProperties.WebUrl + NewUserRequestWorkflowProperties.TaskListUrl;
}

References