Sunday, September 27, 2009

User Control Error In SharePoint

Background

I was getting the following error when trying to build a simple hello world user control (ascx) and then load it into a web part.

Error

The file '/_controltemplates/XXX/MyWebUserControl.ascx' does not exist.

at System.Web.UI.Util.CheckVirtualFileExists(VirtualPath virtualPath)

at System.Web.Compilation.BuildManager.GetVPathBuildResultInternal(VirtualPath virtualPath, Boolean noBuild, Boolean allowCrossApp, Boolean allowBuildInPrecompile)

at System.Web.Compilation.BuildManager.GetVPathBuildResultWithNoAssert(HttpContext context, VirtualPath virtualPath, Boolean noBuild, Boolean allowCrossApp, Boolean allowBuildInPrecompile)

at System.Web.UI.TemplateControl.LoadControl(VirtualPath virtualPath)

at System.Web.UI.TemplateControl.LoadControl(String virtualPath)

at MOSSDistillery.UserControl.WebPart.MySmartPart.CreateChildControls()

Symptoms

What was frustrating was that I could point to any existing user controls provided in SharePoint and they load in fine. Here is the code:

protected override void Render(HtmlTextWriter writer) {
base.Render(writer);
writer.WriteLine(loadControlError);
}
protected override void CreateChildControls()
{
try
{
base.CreateChildControls();

System.Web.UI.UserControl control = (System.Web.UI.UserControl)Page.LoadControl("~/_controltemplates/MyWebUserControl/MyWebUserControl.ascx");
Controls.Add(control);
}
catch (Exception ex)
{
loadControlError = ex.Message + " " + ex.InnerException;
}
}

This error was pretty tough to figure out because:

  • The ascx file was in the correct place.
  • I had entered a safe controls entry.
  • If I changed the web.config to Full trust, everything would work.

I did a significant amount of investigation to understand why I was getting this error. From what I was able to find out, you will get this error in the following scenarios.

  • If you have the ascx file in a location where it cannot be found.
  • If you place the web part dll in the web bin directory and do not place that ascx control in the ~/_controltemplates/ directory. Specifically if you place the web control in a custom folder within the control templates folder in the 12 hive folder. Even with all the correct CAS permissions, it will not work. However if the web part dll in the GAC, it will work.
  • If you place the web part dll in the web bin directory, the error will go away if you move the code from the CreateChildControls() to the OnInit().

Resolution

When research the solution, I saw that many people would just change the permissions levels to full which is a completely unacceptable solution. The following are some deployment options for a web part that will show an ASP.net user control. I have ordered them in the most secure to least secure:

  • Deploy the web part dll to the bin. Add the code to load the user control in the OnInit() method. Place the user control (ascx) directly into the control templates folder in the 12 hive. Make sure you have a safe controls entry in the web.config. Only disadvantage is that you cannot place the user control into a custom folder to separate your user control from SharePoint's user controls. However this is the most secure.
  • Deploy the web part dll to the GAC. Place the loading of the user control into the CreateChildControls method. Place the user control (ascx) where ever you want within the control templates folder in the 12 hive directory. I suggest putting the user control into a custom folder. Make sure you have a safe controls entry in the web.config. The disadvantage is that the dll is not accessible to any running process on the web server. I know many developers have become accustomed to putting dlls in the GAC but again you should always strive to deploy to the web bin and run under minimal trust.
  • I found this option - http://blogs.msdn.com/chandru/archive/2009/03/02/cas-in-sharepoint.aspx. It does work however what you are basically doing is allowing the custom CAS permission you have created for your web part to run in full trust. There are several major issues with doing this. First, the stsadm addsolution command will fail if Unrestricted="true" is added to the PermissionSet within the manifest.xml file – it is not allowed. Second, you decided to do this, will have to manually make the change to each front end web server in the farm which is a deployment problem. Third, you are allowing all dlls running under the CAS permission to run with full trust.
  • Run SharePoint in full trust – please do not do this – it is highly unrecommended.

Saturday, September 26, 2009

Excel and PDF Data Dump in SharePoint

Background

I recently had to come up with a quick solution in a week to provide both Excel and PDF downloads of datasets that I was being presented through some SharePoint web parts. I had to create some use controls that would be embedded into SharePoint that providing reporting data. The user needed the ability to down load the underlying datasets in either Excel or PDF.

My natural first inclination was to use SSRS because first it has tight integration with SharePoint. Second the report viewer control provides the ability to download the report and excel and pdf formats. Well in this case I could not use SSRS because it was not part of the solution architecture. As well, I needed to find a "free" solution.

Excel Solution

For Excel, I investigated a couple different solutions. I particularly did not want to have to mess around with the Office Excel API. First the API is not very clean and would be time consuming to code to. Second I would have to install Office onto the front end web servers. Then I thought, how about providing an XML file that opens into Excel? I though, InfoPath is just an XML file with specific processing tags embedded into it which would open InfoPath. I recalled that the same could be done with Excel. I subsequently found this blog posting (http://www.ksaelen.be/wordpress/2009/08/using-c-xml-xslt-to-create-excel-spreadsheet/) and it provided me with an extremely easy way of generating excel data dumps. All you basically do:

  • Create an Excel file with all the presentation you want.
  • Save it is as an Office 2003 XML format.
  • Change the XML file to an *.xsl file.
  • Make modifications to the .xsl file to merge in data from another XML file which has all the data.
  • The use the XslCompilatedTransform class to merge it together.
  • Then I took the results, put it into a MemoryStream and saved down into a document library.

The limitations of this solution are that any charting and code modules you may want to include in the generated XML file is not supported. This is really only a good solution for doing a data dump of the underlying data that may be presented to a user. However it is really simple to implement, requires no special add-ins, you can stylize your presentation and you can be provide very dynamic results. Plus many of the reports provided by SharePoint use XML Excel files so I did not feel too bad in doing this.

PDF Solution

The next thing I had to do was provide the same results in PDF format because not everyone would have Excel. Now the solution above will support both Office 2003 and 2007, however someone may not have Office installed at all. I looked into several tools that would do PDF generation from HTML, but I needed to keep cost down. I subsequently found a very mature open source PDF library called PDFsharp and MigradDoc Foundation:

The source code is very well written, commented and managed. This scored big points in my book because I usually shy away from open source solutions strictly for code maintenance reasons. These guys also provided tons of code samples and provide the ability to do basic charting too.

I was able to in an afternoon, pull in the library and generate tables of data into PDF. It was very easy for me to then save it down into a document library and provide a user a link to that generated PDF. I specifically used the MigraDoc API to save the generated PDF into a MemoryStream and then just push that right into a SPListItem.

Monday, September 7, 2009

Using old VHDs on Windows Virtual PC

Background


Couple weeks ago I put Windows 7 on my new laptop. As a developer one of the first things I had to do was take advantages of the new virtualization features provided by Windows 7. For the past five years I have been using Microsoft Virtual PC for everything. I have preached and preached it for the past couple years because:

  • I can create dedicated environments for projects and/or clients.
  • My environments will not dependencies installed within them that could implementations between environments.
  • I can save state and come back to something at any time.
  • It is really easy for take a snapshot and then do something risky or install some new flaky software.

I had mostly used Virtual PC 2007 SP1 and had become familiar with Virtual Server. When I put on Windows 7 on my machine; I really did not know a couple things had changed. I am not a desktop OS person and I had not read much about Windows 7 – other than I held off from Vista.


My goal is to have my host OS on 64 bit with Windows 7 and bring over all my old vhd drives and run them on this machine. You cannot run Virtual VPC 2007 on Windows 7, however the .vhd files created by Virtual VPC 2007 can be used with Windows Virtual PC on Windows 7.


Here are the key differences on the surface you should know when moving over to Windows 7 and using virtualization:

  1. It is now called "Windows Virtual PC"
  2. The interface is different from what it used to be.
  3. Microsoft is now using it as a strategy to allow every day desktop users use it to get backwards compatibility to applications that work on Windows XP.
  4. VHD files can now be mounted (attached) as a disk and then access the files within the VHD directly on the host machine windows explorer.
  5. It possible to boot the VHD as a duel boot.

Installation


Installation is not that hard. First go here and select information about your Windows 7 OS. You will need to minimally download Windows Virtual PC RC. Go ahead and then download Windows XP Mode RC. You can also get all the installation instructions right off this page.


Some important pre-requisites steps that you will need to complete are:


  1. System requirements - http://www.microsoft.com/windows/virtual-pc/support/requirements.aspx - Upon reading the system requirements you may note that only Guest Operating Systems of Windows XP, Windows Vista and Windows 7 are only supported. Do not be alarmed, this basically means you will not be able to take full advantage integration between the host OS and guest OS. I can say for the past couple weeks I have been able to bring over several of my VPCs running on Windows Server 2003 with no problem. I know others who have been able to bring over Windows Server 2008.
  2. You need to make sure that your BIOS are properly set up. Follow the instructions here - http://www.microsoft.com/windows/virtual-pc/support/configure-bios.aspx
  3. Install the Windows Virtual PC RC.
  4. Install Windows XP Mode RC (optional).

Windows Virtual PC


As I mentioned, the User Interface has changed as it is integrated within Windows Explorer. I am not going to give a tutorial on how to use it however; here is what it looks like. After the installation there will be a new folder called Virtual Machines created which is where you can access and your VPCs. As you can see all of the files and there is a new tool bar being displayed.


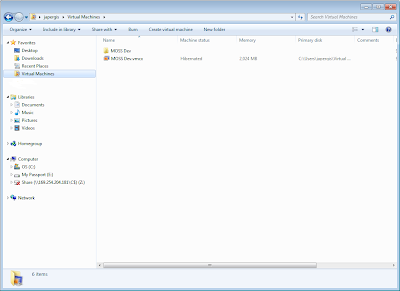
Taking a close look at the tool bar, when I select a .vmcx (which is equivalent to a .vmc for VPC 2007), you will see an "Open" option added to the tool bar. You can click on that or just double click the .vmcx file which will start up the VPC.

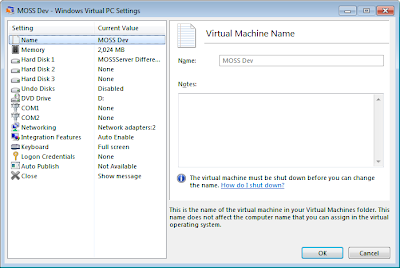
You will also notice that there is a "Settings" option in the tool bar when you select a .vmcx file. When you click on Setttings, you will get the traditional VPC Settings screen we are familiar with to configure memory, disk, networking, etc.


Finally in the tool bar, there is a "Create virtual machine" button which will launch a wizard to create a new VPC. This wizard is again very similar to Virtual VPC 2007.


You now see that using VPCs on Windows 7 is more of an integrated experience.


Windows Virtual PC >> Windows XP Mode


As I mentioned this is an optional installer. From what I can tell, the strategy by Microsoft it so use virtualization to allow backward support of applications. As well, the way this is marketed, it is more meant for the everyday desktop user. What it allows is a user to get a XP VPC running (without any licensing), to run older applications. I personally think it is great. Plus if you are worried about your kids or wife getting some virus while surfing or what not, have then surf on the VPC J


Running an Old VPC


Like I mentioned, I needed to run some vhd files I had created with Virtual VPC 2007 that had a guest OS of Windows Server 2003 (which is not supported). This is all you need to do:

  1. Move the vhd file over to your Windows 7 machine. I suggest that you create a folder under C:\Users\[username]\Virtual Machines\ and place the vhd there.
  2. Then go to C:\Users\[username]\Virtual Machines\ directory and click "Create virtual machine". This will initiate a wizard.
  3. Specify a name and change the location to point to the location where the vhd file is. Press Next.
  4. Specify RAM and press next.
  5. On the "Add a virtual hard disk", select the "Use an existing virtual hard disk" and select the vhd file that was moved over. Press the Create button and you are complete.

When this is completed, a .vmcx file should be created in C:\Users\[username]\Virtual Machines\. To boot the VPC, all you need to do is double click that file, or select Open button in the tool bar. I suggest verifying the configuration by pressing the Settings button before spinning it up.

Here are some things you may run into.

First you will see a pop-up saying "Updates for Windows Virtual PC Integration Components are available" every time you reboot the guest OS. DO NOT press the update button. This will install the integration components for Windows Virtual PC which is not compatible with either Windows Server 2003 or 2008. I tried it; it did not work. Just press the cancel button and you will be fine.


Second, you will constantly get a prompt after log in saying New Hardware has been found. Again, just cancel.


After that, you should be good to go.

One thing I have not tried is creating a brand new VPC with Windows Server 2003 or 2008 using Windows Virtual PC. I wonder how the integration between the Host and the Guest will work without installing the additions in the Guest OS; remember you cannot install the Windows Virtual PC additions. I guess the only option would be to run the vhd on a machine which had Virtual VPC 2007 SP1, install the additions, and then bring the vhd back to the Windows 7 machine.

Sharing Files

Because the integration components do not work with Windows Server 2003 and 2008 on a guest OS, it is not possible to drag and drop files between the host and guest. As well, if you go to the settings of the vmcx file, you will see the Integration Features option. Even if you try to select Drives here, they will not work.


The best way to accomplish this is to:

  • Create a loop back adapter on your host machine running Windows Server 2007.
  • Then click on the Networking settings for the vmcx. For the first adapter set it to NAT and for the second adapter select the Microsoft Loopback Adapter you just created on the host machine.
  • Then create a Shared Folder on the guest OS.
  • Then map to that folder of the guest machine from the host machine.

Experiencing Slowness?


If you are experiencing any slowness in the UI resolution of the VPC the following KB will help you out - http://support.microsoft.com/kb/899525. Even though it is a fix for Virtual VPC 2004, it does help with Windows Virtual PC. The location of the Options.xml file is %userprofile%\AppData\Local\Microsoft\Windows Virtual PC\


Mount a VHD Drive


Now this is a really cool new feature of virtualization with Windows 7. You now have the ability to treat a vhd file like a drive on the machine. Please read the following - http://thelazyadmin.com/blogs/thelazyadmin/archive/2009/01/15/mount-a-vhd-within-windows-7-server-2008-r2.aspx.


However you cannot do this while the vpc is running, so this is not a good open to share files between the host and guest OS if you need to do it on a regular basis.


One cool thing is if you do not want to boot up an old vhd to get some files of it, all you need to is mount it. You can go right into the vhd using your host's windows explorer and extract or use any of the files on there. I suspect people will start coming up with really creative ways to use this over the next couple of months.


Dual Boot from VHD


Now this is what many folks are blogging about, it is your ability to do a dual boot from your vhd. Please read here - http://blogs.technet.com/keithcombs/archive/2009/05/22/dual-boot-from-vhd-using-windows-7-and-windows-server-2008-r2.aspx.


Again I plan on taking advantage of this really soon to maximize memory usage because there is no need to run the host OS anymore…

Saturday, August 15, 2009

Preparing for SharePoint 2010

I recently installed Windows 7 on my new laptop that I got for work. The ultimate goal is I want a machine where I will be able to run SharePoint 2010 to do local development. The core requirements that everyone has been hearing about for SharePoint 2010 is:

  • 64 bit
  • Server 2008
  • 8GB RAM minimum

These requirements are going to be pretty taxing. A lot of the mid level companies have been able to install SharePoint 2007 and do some effective solutions. They were able to upgrade using their SharePoint 2003 environment or similar infrastructure which they already had. Many times clients have tons of performance problems even with SharePoint 2007 because they did not have sufficient hardware provisioned but that is beside the point. Thinking about it a little deeper, this probably should not be too big of deal given that many organizations have server virtualization and hardware itself continues to drop in price. So getting to this requirement is possible. I am looking forward to finding out why the server requirements changed.

However who this hurts the most are the developers. All Microsoft consultants that I know, that work with SharePoint, use localized virtual environments. This is going to hurt our ability to develop in remote environments significantly. We need to be able to do localized development and then build solution packages which we deploy into integration, quality and production environments.

Luckily I was told that my new laptop can have an additional 4GB added getting me up to 8GB. So my solution will be to add more RAM, Server 2008 virtual machine and set it up as a dual boot since I am running Windows 2007 64 bit as my host operating system. Still this is just going to be a really tough thing for most of us to get around.

Friday, August 14, 2009

K2 blackpearl 483 Patch

K2 has released an important patch build based on their latest build which supports Windows Server 2008 and SQL 2008. This is build 483. In this case, build 483 can be installed on top of either a 4.8210.2.X or 4.8210.3.X.

It is important you get this installed and it should be the last one of these for a little. This was put out because these there were some immediate issued discovered.

Here is the upgrade path.

  • If you have a clean machine with nothing on it and install K2 for the first time. Install 4.8210.3.0. Then install 4.8210.X.483.
  • If you have a machine that has Windows Server 2008. Install 4.8210.3.0. Then install 4.8210.X.483.
  • If you have a machine with 4.8210.2.450. Just install 4.8210.X.483.
  • If you have a machine with 4.8210.2.X, prior to the 4.8210.2.450 build. Install 4.8210.2.450. Then install 4.8210.X.483.
  • If you have a K2 machine prior to 4.8210.2.X (i.e. RTM, SP1, 0803). Install 4.8210.3.0. Then install 4.8210.X.483.

The following are the resolved issues that have been rolled into this build.

Friday, August 7, 2009

K2 blackpearl supports Windows Server and SQL Server 2008

Windows Server 2008 and SQL Server 2008 Supported

K2 blackpearl 4.8210.3.0 has now been released. The importance of this release is that Windows Server 2008 and SQL Server 2008 is now officially supported!!!

Here is a link to see other new features and functionality of this release - http://kb.k2workflow.com/ArticleAttach/K2%20blackpearl%200807%20Feature%20and%20Functionality%20Changes.pdf.

Specifically some notice changes for 4.8210.3.0 are:

  • Out of Office has been cleaned up.
  • No more InfoPath Temporary files. What used to happen is when you click on a worklist item that is for an InfoPath client event, it would generate an InfoPath form in the form library. If the user closed the InfoPath without taking action, the form would remain in the form library. Otherwise, the temporary InfoPath form would be deleted by in the succeeding rules of the activity where the InfoPath client resides. Apparently they did this to support the Out of Office functionality.
  • Improvements for team development with TFS.
  • Debugging issues have been resolved.
  • String Tables and Environments been updated for K2.net 2003 migrations.
  • Some performance improvements for Worklist web part.
  • Plus a tons of other things discussed in the release notes…

Visual Studio 2008 is not supported just yet. I know it had been targeted for this release however it should be out soon.

There are two installers for this release. Basically there is:

  • 4.8210.3.0 – Which will support the installation of K2 blackpearl on Windows Server 2008.
  • 4.8210.2.450 – Is a release to upgrade existing 2.8210.2.X installations.

Both 4.8210.3.0 and 4.8210.2.450 are really the same from a bit perspective. You can only install 4.8210.3.0 on a machine if no K2 is installed or if the machine has K2 blackpearl version prior to 4.8210.2.X.

Both 4.8210.3.0 and 4.8210.2.450 support running on SQL Server 2008.

This past week I upgraded a client to 4.8210.2.450 and it went pretty smooth. They also had MOSS on Server 2008 in the farm but their SharePoint and SQL machines were on Server 2003. We were able to install of their Server 2003 machines to 4.8210.2.450 and then installed 4.8210.3.0 on the MOSS machine which had Sever 2008. We did not get time to fully test it but a configuration like that should work.

Release Issues

IMPORTANT - build 483 was released

Thursday, July 23, 2009

K2 Roles

Introduction to K2 Roles

K2 Roles are a way to create re-usable groups of users that can be used across processes. For instance you could create a K2 Role called Accounting Managers and that K2 Role can be used in a K2 Destination Rule. They are similar to an AD Group or a SharePoint Group but a little different. One added advantage of using K2 Roles will be kept in sync with tasks created for users to action. So what does that mean? Basically when you do not use a K2 Role and assign a specific user account to a destination rule that account will tied to the slot that is created at run time. Once the slot is created for that destination user it cannot be changed unless the user or administrator delegates the task. However if the you use a K2 Role, users that are in of the Accounting Managers K2 Role, will have immediate access to the worklist item slot (based on the refresh interval). So this is good thing to use if you anticipate that users who can potentially be assigned a task may change often.

I highly recommend reading this whitepaper - http://k2underground.com/files/folders/technical_product_documents/entry20948.aspx. It explains what is a K2 Role in detail.

Here are some of my notes on K2 Roles:

  • Destination Rules are required to compile a client side event. They can be set to Static user: user dynamically, AD Group, XML list, K2 Role, SmartObject, etc.
  • K2 Roles are a role is a common group that is defined within K2 that can be re-used across K2 processes. K2 Roles can be made of from accounts in AD or a custom repository like in SmartObject.
  • Slots determine how many Worklist items can be Open for an Activity. As soon as a user clicks on a Worklist item, the status immediately changes from Available to Open and 1 Activity Slot is occupied. The number of Slots can be limited to a specific number or a slot can be created for each destination. Slots control how users will work with data. Configuration of the destination rules directly determine how many slots are created.
  • Succeeding rules by default will evaluate the outcomes of actions along with the Slots that are created to determine if the Activity is allowed to go to the next Activity in the process.
  • By default all destination rules are set to "plan just once". A slot will be created for each user and a Worklist items is created however only one activity instance is created. Any time a user is added to a K2 Role it should appear on their worklist based on interval.
  • Plan per Destination supports parallel processing as multiple activity instances will be created for each user. "All at once" allows all users to access the worklist item. One at a time" only allows one user at a time to access the item.
  • Plan per Slot use for an IPC event or call out to an external system.
  • Cached K2 Roles - By default, a single slot will be created for each Role. By default, on a 10 minute interval, the Role and its users will be refreshed with that slot. This can be configured in each K2 process that is deployed by using the K2 Workspace. If you select, "Resolve all roles and groups to users", changes to the K2 role will not be reflected but using the "Keep roles synchronized" checkbox will keep in sync on interval.
  • Dynamic Roles can only be used with "Plan just once" or "Plan per destination" where Roles do not resolve to users. Dynamic roles are on-demand. This means the K2 Role is refreshed when dynamic roles are defined and every time worklists are opened which contain items that use the role. This ensures that new users in a K2 Role will see the worklist item immediately and users removed from K2 Role will have permission blocked.

Getting User who Actioned

When using K2 Roles I have run into situations that have tripped me up a couple times. Let's say I have a client side event (InfoPath) and I want to perform custom code after the InfoPath event. Specifically, I need to know who was the user who actioned the event. To do this you need to execute the following code:

public static string GetActionUser(ActivityInstance activityInstance) {
//Loop over the activity slots to see who was the user who
//actioned the worklist item.
foreach (Slot slot in K2.ActivityInstanceDestionation.ActivityInstance.WorklistSlots) {
if (slot.Status == ActInstSlotStatus.Completed) {
return slot.User.Name;
}
}
return "";
}

What this does is loop over the slots, checks which slot was completed and by whom. You cannot go directly to the ActivityInstanceDestionation because the K2 Role was assigned as the destination user. However slots will be created dynamically for each user in the K2 Role based on the refresh interval.

Email All users in K2 Role

In many situations, I have needed to email all of the users in a K2 Role. One solution to do this without having to write any custom code would be to go to the advanced destination rules of an activity where an Email Event has been added. Select Plan per Destination All at Once. Then select Resolve All Roles to users. Then in the Email Event select send the email to the Destination User checkbox. I would only recommend doing this in an Email Event that is in its own Activity. Do not do this in the same activity where you have a client side event, like an InfoPath event. What this will do is not allow the K2 Role to be dynamic refreshed defeating the purpose of all the stuff we just talked about.

Another approach would be to use the following code to build a string of email addresses that are in the K2 Role. Then set the email string into an activity level field. Then use activity level field in the Email Event wizard. You can see in the code I have an AD SmartObject with a method called GetDetails that I use to get the user's email address.


using SourceCode.Security.UserRoleManager.Management;
using SourceCode.SmartObjects.Client;
public static string GetEmailsInRole(string conn, string roleName){
string emailAddress = "";
conn = conn.Replace(" ", "");
UserRoleManager roleManager = null;
SmartObjectClientServer server = null;

try {
//Create Manager
roleManager = new UserRoleManager();
roleManager.CreateConnection();
roleManager.Connection.Open(conn);

//Get Role
Role role = roleManager.GetRole(roleName);

//SmartObject server reference
server = new SmartObjectClientServer();
server.CreateConnection();
server.Connection.Open(conn);

//Get Person Definition
SmartObject person = server.GetSmartObject("Person");
person.MethodToExecute = "GetDetails";

foreach (RoleItem item in role.Include) {
//Now get the email from the smartobject
person.Properties["ADID"].Value = item.Name.Replace("K2:", "");
server.ExecuteScalar(person);

emailAddress += person.Properties["Email"].Value +";";
}

//remove last semi-colon
emailAddress = emailAddress.Substring(0, emailAddress.Length - 1);
}
catch (Exception ex) {
}
Finally {
if (roleManager.Connection != null) {
roleManager.Connection.Close();
}

if (server.Connection != null) {
server.Connection.Close();
}
}

return emailAddress;
}
}