Wednesday, December 30, 2015

New Office 365 Planner

Introduction
There is a new capability being released to Office 365 called Office 365 Planner (also referred to as Work Management in Office 365).  Office 365 Planner will help organizations with teamwork.  With Office 365 Planner you have the ability to create new plans, create / assign / organize tasks, set due dates and update statuses.  Users have the ability to attach documents to tasks and have conversations around those tasks.  There are also visual dashboards to see overall progress of tasks for a plan or across plans.

I really like this new, easy to use application introduced into Office 365.  Office 365 Planner (Work Management) is an application that sits between standard Task Management that you get in Exchange Online / SharePoint Online and Project Online.  It provides users the ability to quickly create work areas to manage teamwork for ad-hoc projects and the tasks associated to them.  Yes, SharePoint Online has provided this type of capability for years, however the new Office 365 Planner capability provides a fresh, new spin to this.  It is really simple for an “every day” end users to use.  You will have the ability to create tasks quickly, work collaboratively and have visibility into these tasks.
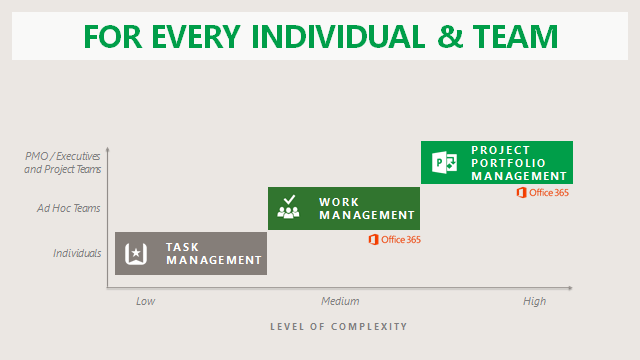
 
 
Direction of New Office 365 Services
As you will notice, Office 365 Planner is a new Suite capability.  Several other services like these such as Office 365 Delve, Office 365 Groups, Office 365 Video, and Sway have been introduced as Suite capabilities.  These solutions cannot be purchased individually; they come part of the value of the Suite.  In many cases, you see these are like composite cloud applications that bring together Exchange Online, SharePoint Online, OneDrive, Office Online, Office 365 ProPlus, etc. to deliver a solution.  In this specific case, Office 365 Planner and Office 365 Groups are tightly integrated.  When you create an Office 365 Plan, an Office 365 Group gets created.  You can also add an Office 365 Plan to an existing Officer 365 Group.
This is the direction I see going with Office 365.  New cloud applications being introduced that bring together capabilities with consolidated user experiences and solutions.
Features of Office 365 Planner
Here is a quick walkthrough of this new Office 365 Planner capability.
To initiate the Office 365 Planner app, you simply need to go into Office 365, click the Launch Planner (the waffle) then select Planner.  Press the Planner tile and the app will be launched.
 
Once you are in, you will see the Planner Hub screen.  This where you will see all the plans that are participating in.  All of your plans are located on the bottom and you can also see your favorite plans (ones you are probably working on the most) along with a summary of those favorites on this screen.
 
Next you can click on My Tasks where you can see all of your tasks across Office 365 Planner.  There are grouped Progress or you can Pivot it to group by plans.  As you can see it is a simple interface that shows you all the tasks that you need to work on with a simple format.
 
To create a new Plan, you simple press the New Plan button.  You provide simple details.
As you will see the Office 365 Planner capability is directly hooked into Office 365 Groups.  When you create an Office 365 Plan, a corresponding Office 365 Group is created.  This brings in the power of Office 365 Groups which subsequently brings in a shared Notebook, Conversation, Calendar, Membership management, Files, etc.  So within each plan all of these other solutions can be used with the Plan to manage files, conversations calendars, share notes, etc.
 
Here is the Board View of an Office 365 Plan.  You can see all the tasks that have been created initially grouped by Progress.  On this screen you have the ability to quickly create a task for the Plan.
You also have the ability to drag tasks between status columns in this screen which will set the status of that task for you.
 
You have the ability to create your own custom buckets and then group tasks by those buckets.
It is really simple to see all to the members of the Office 365 Group that has access to this Plan.  You can quickly give people access to the Plan from this screen.
You can even quickly assign someone to a specific task by dragging their profile picture to the task for assignment.
 
Within a task you have the ability to do several things.  You can associate a task to a bucket of tasks, change the status, the dates of the task, enter a detailed description, assign a color tab indicator to the task to help you find important tasks, attach files, and have conversations about a specific task.
 
When you click on the Chart view for a Plan, you will be taken to this summary screen.  Here you can see a report of all the tasks, what is their status is and who needs to complete what.  You can visually see where tasks are running late and you can quickly take action on them from here.
 
If you have Outlook 2016 installed, you will have access to the Office 365 Plan and Group from Outlook.  You can access all the tasks, files, conversations, calendar items, etc. without having to go to the browser if you wish.
Additionally, there is a mobile experience for Office 365 Planner consistent with the web browser.  You do have the ability to create and manage tasks on the go from your mobile devices.
 
Is Customization Possible?
There is an API around this so there can be customer integration built to it.  You have the ability to create, assign, update tasks, create plans, etc. for integration to custom solutions.  For instance you have an application that needs to create task for someone to complete.
References
Office 365 Planner Service Description Reference - https://technet.microsoft.com/EN-US/library/office-365-suite-features.aspx


First Release Program Expansion

The First Release program has some new updates you should be aware of.  This has been a program that I have been following for some time and really like the options this feature provides to Office 365.

The First Release capability allows organizations to be prioritized in receiving updates to the service.  You will receive updates more quickly.  This makes sense for some organizations but sometimes large enterprise organizations with complex IT environments will not want to do it.  A middle ground was introduced several months ago so that “select people” could receive the First Release features which is very helpful for large organizations with complex IT environments.

There have been some recent updates.  SharePoint Online, OneDrive for Business and Office 365 ProPlus have been added to the First Release for Select People.  Exchange Online is already available. 


Resources
Office 365 First Release - https://support.office.com/en-us/article/Office-365-release-options-3B3ADFA4-1777-4FF0-B606-FB8732101F47
Expansion of First Release Program Announcement - https://blogs.office.com/2015/12/08/more-services-join-first-release/
Individual User First Release Announcement - https://blogs.office.com/2015/05/05/manage-change-and-stay-informed-in-office-365/ and http://www.astaticstate.com/2015/05/office-365-first-release-for-specific.html

Tuesday, December 29, 2015

Advanced eDiscovery with Equivio

Introduction
About a year ago Microsoft made an announcement for the acquisition of a company called Equivio with the plans of incorporating it into Office 365.  Equivio or Office 365 Advanced eDiscovery is now available and is part of the new E5 suite.

Advanced eDiscovery with Equivio provides organizations the ability to perform eDiscovery analysis across significant volumes of unstructured content using machine learning, relevance/predictive coding and text analytics.  This will enable organizations to tactically search through emails, documents, files and instant messages that are stored inside of Exchange Online, SharePoint Online, OneDrive for Business and Skype for Business Online.  Advanced eDiscovery achieves this by removing duplicate files, reconstructing email threads, identifying key themes and data relationships.

Enterprise organizations are presented with a real eDiscovery challenge today.  They have significant volumes of data they need to go through.  Today with Office 365 (depending on your plan) a user could have unlimited email storage, along with 1 TB of personal OneDrive storage plus SharePoint Online collaboration data they use.  An organization can use Office 365 eDiscovery tools to find data across Office 365 however that could produce a significant amount of data.  That significant amount of data can be exported but it will need to be reviewed file-by-file by lawyers.  That review of data will have a significant cost to the organization.  Organizations are looking for solutions that can prune, pair-down and identify the most relevant data.  Office 365 Advanced eDiscovery with Equivio can assist with this.
Let’s review the new Office 365 Advanced eDiscovery.
At a High Level
At a high level, there are several key features of the new Advanced eDiscovery (Equivio).
  • Near-Duplicate Detection – With large volumes of data there will documents that are the same or have be nearly the same.  Instead of having multiple people review different versions of the same document, it is more efficient to group same/similar documents together and have a single person review those documents.
  • Email Threading – Allow reviewers the ability to focus on the unique text of an email thread versus having to focus on all the duplicative text in an email thread.
  • Themes – Will help reviewers by grouping (or clustering) related documents for added context.
  • Predictive Coding – This capability will allow the Advanced eDiscovery solution to automatically identify relevant data.  Advanced eDiscovery has a machine learning component that can be “trained” using a sample set of data.  Once “trained” the system can make relevancy decisions across all the data in the case.
These features will become more apparent later within this blog.
So what is the relationship between all Office 365 eDiscovery Solutions?
Advanced eDiscovery with Equivio works in concert with the eDiscovery capabilities already delivered in Office 365.  You will still use Office 365 eDiscovery to initially search content sources.  Once the searches have been completed, you will use the new Advanced eDiscovery (Equivio) to perform analysis on that data.  Here are some of the major solutions.
  • Exchange Online In-Place eDiscovery – This capability has been in Exchange Online for a while.  Administrators have the ability to perform eDiscovery across mailboxes, place items on legal hold, data export, etc.
  • Skype for Business Online eDiscovery – Is enabled through Exchange Online capabilities.
  • SharePoint Online and OneDrive for Business Search / Hold / Export – SharePoint Online has capabilities to discover, hold and export data natively in that service.
  • eDiscovery Center in SharePoint Online – Is an eDiscovery portal solution that allows for you to create and manage cases for eDiscovery, legal hold and data export across SharePoint Online, OneDrive for Business, Exchange Online and Skype for Business.
  • Compliance Search – In a new capability that works with Exchange, SharePoint, OneDrive for Business and Skype In-Place eDiscovery.  Specifically, Compliance Search has no limits on the number of target mailboxes that can be searched.  This is especially important if you have an organization larger than 10,000 mailboxes and you want to perform a search across the entire organization.  Once you have identified the data in Compliance Search, you have the ability to manage legal hold, data export, etc. though the respective In-Place eDiscovery capabilities previously mentioned.
Knowing these solutions, where does Advanced eDiscovery with Equivio play in? 
Advanced eDiscovery with Equivio can be used after you complete a Compliance Search.  It is very common that the results of a Compliance Search could yield a lot of data depending on the scope of your search.  However, not all that data may not be relevant to the case.  Organizations need tools that will help them identify only the relevant data.  When there are significant volumes of content, it is not realistic that hundreds of thousands of files will each be read.  This is where Advanced eDiscovery with Equivio can help.
Simple Scenario
A common scenario would be that an organization wants to ensure that the amount of data being provided meets the minimum required by a court.  The organization wants to make sure that they provide the most relevant data and they have a significant amount of data they need go through.
First we go to the Compliance Admin Center >> eDiscovery and then create a case.
 
Then in the eDiscovery case, we have the ability to search across Exchange Online, SharePoint Online, OneDrive for Business and Skype for Business Online.  Once you have your queries defined, you can then click the “Analyze with Equivio Analytics” link.
 
A screen will come up for you to confirm sending the data over for that query to Equivio for preparation.
 
Once the preparation is completed, you need to click on the “Go to Equivio Analytics” link back on the Compliance Admin Center >> eDiscovery screen.  You then need to create a Case in Equivio and associate search results you just sent over.  Here is an article for the past few steps just described - https://technet.microsoft.com/EN-US/library/ms.o365.cc.customizeexportwithzoom.aspx. 
Once that is done, you can configure near-duplicates, email threads, themes and text that should be ignored configurations.  Here is an article with more information on these configurations as there is a lot of detail to this which can impact the Equivio analysis - https://technet.microsoft.com/EN-US/library/mt297882.aspx and https://technet.microsoft.com/EN-US/library/mt297873.aspx. 
Once you have your configurations complete, press the Analyze button.
Upon completion of the analysis, you can see the following results.  This will tell you how many types of files you have as well as information that shows you how much unique data there is.  The report has emphasis on identifying unique data.  Here is some more information about this report - https://technet.microsoft.com/EN-US/library/mt297878.aspx.
 
Once you have completed initial assessment of the data, we to determine the relevancy of the data.  The way this is done is by training the system (Equivio) to know how to identify relevant data.  This is enabled through the machine learning / predictive coding features of Equivio.  As you can see below, the initial Assessment has been completed and training need to be initiated.  Simply press the Training button.
Next you will go through a sample of the data selected by Equivio (commonly in 40 file batches).  Your analyst (knowledgeable with the case) will mark data as being relevant or not-relevant.  This marking of files will be used by Equivio to determine the richness of the data and will be to perform statistics.  For more details on this process, read this subset of articles - https://technet.microsoft.com/en-us/library/mt303697.aspx.  In the screenshot below, the file was marked as relevant.
In the screenshot below, the file was marked as not-relevant.
Once enough data has been reviewed, you will see that training is complete and now it is time to complete Batch Calculation.  Press the Batch Calculation button.
Batch calculation will go through all of the rest of the files for you and apply a relevancy score.
Once Batch Calculation is complete, you need to review the findings on the Decide step.  This is the step where you need to decide how many more documents you want to review and how much it will cost for that review.  The objective is find an acceptable Cutoff point.  Why?  Because pulling out all of the data for legal review is not cost effective; especially when we are working with significant volumes of unstructured data.  An organization needs to find the right balance between discovering as much data as possible while at the same time reducing the amount of actual files a lawyer would have to review.  This saves real money when we are talking about significant volumes of data.
 
Let’s dig into this report a little more.
First, the “Review” is the percentage of files reviewed based on the cut-off point.  Second, the “Recall” is the percentage of relevant files in the review set.
In this specific example below, the total number of files in the collection being analyzed is 685,591 files.
The Richness is the total number of relevant files in the entire collection.  In this case the Richness was determined to be 5.20% of the files (or roughly 35,000 relevant files).
The number of documents Reviewed in this specific set is roughly 137,000 files (or 20% of the total files in the collection).
At this specific Review-recall ratio, the Cutoff Score is 7.42.  What does this mean?  During the training and batch calculation steps, each file was given a relevance score between 0 and 100; 100 being the most relevant. 
Here is the really important part of this analysis.  If lawyers were to review all files that have a Relevance score of higher than 7.42 (which is 20% of the total data) they would find 84.6% of the relevant files (roughly 30,000 relevant files).
In this example there is some simple cost analysis.  If it were to cost $1 to have a lawyer review each file, there is a cost of roughly $135,700 for that to be completed.  The $1 was set as something simple and is a configurable parameter.
You may then wonder, what would the cost implications be to review more data?  Equivio support this by allowing you to use the slider in the Review-recall ratio section.  In this specific example, if you drag that slide to review 28% of the data, Recall will increase to 90.4% of the relevant files being produced for lawyer review.  This does increase the cost to $189,900 for them to review those additional files.  This could be considered a cost effective decision depending on your organization’s risk profile.
You can again increase the Review of documents to 56% of the files, this will provide a Recall to 97% of the relevant files.  However, as you will see there is a cost of $384,700; which is double the cost.  At some point a determination needs to be made where is an acceptable Cutoff for your organization.  In this third case, you are spending twice the amount of money to review documents that have a very low relevance score.
 
If you want to do some additional testing based on the information in this report, there is a Test Relevance feature where you can test the rest of the data.  You can manually tag more data and perform more analysis - https://technet.microsoft.com/EN-US/library/mt303692.aspx.
The final step is to use the Export capability.  This will allow you to export all the files used in the case in Equivio.  Remember using this export removes all off the near-duplicates and consolidates the email threads.  This means using this tool, lawyers have less files to review and those files are grouped together.
 Can Advanced eDiscovery with Equivio be used with data outside of Office 365?
The answer is yes.
With Office 365 you have the ability to bring data from your premises solutions and pull them into Office 365.
 
Additionally, third-party archiving solutions are being introduced that can feed data from other platforms into Office 365.  Once that data is in Office 365, it can be managed and just like any other file in Office 365.  Thus the data is now discoverable.
 
Conclusions
This is a really interesting solution that has been introduced into Office 365.  It will go a long way towards helping enterprise customers work with the significant volumes of data that they need to work with.
References
Office 365 Advanced eDiscovery in TechNet - https://technet.microsoft.com/en-us/library/mt303716.aspx - tons of articles that show how to execute this capability…


Monday, December 14, 2015

Office 2016 upgrades for Office 365 ProPlus are coming!

Introduction
If you are an Office 365 ProPlus customer, there is some new planning information that has been published to help get you prepared for the Office 2016 release of Office 365 ProPlus.  Here are some important things that stood out to me.
  • Which Update Branch do you want to use? – There is a new capability that allows you tactically control what types of updates you want push down to devices that have Office 365 ProPlus installed.  Specifically, there is new a delineation between security updates versus feature/bug fix updates.  Some customers want to delay feature/bug fix updates in favor of getting security updates pushed out quickly.  This is a new configuration needs into the Office Deployment Tool.  This is called Current Branch versus Current Branch for Business.
  • New Office Deployment Tool – Yes there is a new tool you need to pull down and work with.
  • How long is Office 2013 still good? - Office 2013 version of Office 365 ProPlus can be used until February 2017.  After that, there will be no longer updates to the Office 2013 version.  This gives enterprise organizations time to roll out Office 2016 to their desktops as a majority of enterprise customers control how updates are pushed.
  • Can you still control updates to 2016 off internal network? – Absolutely, that process does not change.  You still need to do some updates with the Office 2016 Deployment Tool.
  • Downloading Office from Portal – Users that go to the portal will get Office 2013 until Feb 2016.  After that, Office 2016 client would be available for download.
Some other side notes:
  • ProPlus InfoPath 2013 – Note is not part of the Office 2016 Office 365 ProPlus install.  If users still need it, it is available for individual install through the Software page in the Office 365 portal.
  • ProPlus Visio / Project 2013 – Apparently when you upgrade to Office 2016 with Pro ProPlus, the Office 2013 ProPlus Versions of Visio and Project will be removed.  It is not possible to re-install those 2013 version.  You do have the ability to upgrade to Office 2016 ProPlus versions of Visio and Project.
References
Prepare to upgrade Office 365 ProPlus to the Office 2016 version - https://technet.microsoft.com/en-us/library/mt422981.aspx
Overview of update branches for Office 365 ProPlus - https://technet.microsoft.com/en-us/library/mt455210.aspx

Tuesday, November 24, 2015

Skype for Business Online Cloud PBX Quick Introduction

Introduction

There are some extremely exciting capabilities that will be available with the upcoming release of Cloud PBX for Skype for Business Online. I work a lot with customers who have been evaluating Office 365 and one of the hardest discussions I have had with customers is around the Lync / Skype Enterprise Voice. Previously, if a customer was a Lync Enterprise Voice customer on-premises customers had to retain all the Lync capabilities on-premises.

What has changed?

Well this is no longer a limitation anymore and there are scenarios that enterprise customers seek are now supported.

What is powering this is the new Cloud PBX with on-premises PSTN Connectivity and Skype for Business Hybrid.

The following import scenarios can be supported:

Skype for Business Online with on-premises PSTN - In this scenario an enterprise organization can move all of their end users to Skype for Business Online in Office 365 and have the ability to use the new Cloud PBX with on-premises PSTN Connectivity that will integrate Enterprise Voice capabilities from existing on-premises PSTN investments. In this case end users will get all the capabilities such as IM, presence, web meetings, desktop sharing, application sharing, etc. from the cloud while using the on-premises PSTN to integrate Enterprise Voice capabilities.

Skype for Business Hybrid with on-premises PSTN – In this scenario enterprise organizations have the ability have some end users receive Skype for Business services from on-premises while other end users receive Skype for Business Online services from Office 365 using a regular hybrid configuration. Plus in this configuration you can use the new Cloud PBX with on-premises PSTN Connectivity to allow all of the end users to receive Enterprise Voice capability from existing on-premises PSTN investments. This is a very attractive solution for enterprise organizations that want to take a phase transitions to the Office 365.

Other Hybrid Scenarios with Exchange and SharePoint – Additionally there is extremely flexible options to integrate Exchange on-premises, Exchange Online, SharePoint on-premises and SharePoint Online with both of the scenarios listed above. I consider this a different type of hybrid where you can have a mix-and-match strategy of collaboration services spread across the cloud and on-premises based on your organizations transition strategy or long-term co-existence with the cloud. Microsoft vision in supporting enterprise organizations is impressive.

So how do you plan for this?

Well there are lots of really good resources that I highly recommend you start reading to prepare and plan for such a design. From these links, you can go deeper into design considerations for your enterprise organization. I recommend reading the following articles in this order.

Learning the Topology and Server Roles for Skype for Businesshttps://technet.microsoft.com/en-us/library/dn933894.aspx – First you need to sit down and learn all of the server roles and topologies needed for Skype for Business Server 2015 on-premises. Do not worry, this article is really straight forward to understand. This will be the baseline for your understanding of the on-premises dependencies you will have. Plus you should review these simple understand topology diagrams - https://technet.microsoft.com/EN-US/library/gg398095.aspx.

Plan Skype for Business Hybridhttps://technet.microsoft.com/en-us/library/jj205403.aspx – In this article you will learn all the considerations for planning a Skype for Business Hybrid configuration with Office 365. Depending on the specific configuration you have you may have to introduce some updates into you Lync server farm that is on-premises.

Exchange and SharePoint Hybrid Scenarioshttps://technet.microsoft.com/EN-US/library/jj945633.aspx – This is another really good resource that will walk you through the supported configurations and capabilities available with Skype for Business on-premises and Skype for Business Online with Exchange on-premises, Exchange Online, SharePoint on-premises and SharePoint Online.

Planning and Deploying Cloud PBX with on-premises PSTNhttps://technet.microsoft.com/EN-US/library/mt455212.aspx – This article explains the major considerations for planning and configuration of Cloud PBX for on-premises PSTN. It has some important discussions such as what features and capabilities of Enterprise Voice that are available, solution benefits, performance / networking considerations, deployment considerations, and major steps you need to take to complete the configuration. The major steps are:

  • Enabling users for Enterprise Voice capabilities.
  • Assigning a Voice Routing Policy to your Skype for Business on-premises deployment.
  • Moving Skype for Business users to Skype for Business Online. Requires Azure AD sync to be configured and ADFS configuration.
  • Enable users for Cloud PBX.

This has extremely good information.

Plan for hybrid voice with no on-premises server deploymenthttps://technet.microsoft.com/EN-US/library/mt605227.aspx – Finally read this article if you have already deployed 100% to Skype for Business Online and you want to add Cloud PBX with on-premises PSTN support to your configuration. Really this article builds off all of the other information that you read about in the previous articles.

Conclusion

In conclusion Microsoft and empowering organizations to transition to the cloud in an extremely flexible manner. The new Cloud PBX with on-premises PSTN is yet another example of this flexibility and I am excited to see customers take advantage of this soon.

New Office 365 File Sharing Features in Outlook 2016

With the release of Office 2016 with Office 365, there are new amazing simple features that have been added to the service that will change the way you share Office documents. Sometimes it is these little things have huge impact on how you collaborate.

Up to this point, when you want to share files via email or SharePoint you have had to take a number of steps to share that file. In that past, if you need to solicit feedback on an Office file you have had to take clumsy steps to get that feedback. Sometimes people will take that file, rename, edit it and then email that file back to you. Then you are stuck with multiple versions of a file and you need to bring in all the comments from people back into your file. Worse yet, people will review the wrong versions of the file. You can resolve this issue by simply putting the file in SharePoint however sometimes configuring SharePoint to share a file can be a chore.

So what has changed?

Let’s look at some of these new features.

In Office 2016 there is a new Share button. All you need to do is save your Word, Excel or PowerPoint file to OneDrive for Business or SharePoint. Then press the Share button in Office 2016. You have the ability to select who you want to share the file with, what permissions they have and provide them a message. If you noticed, you no longer need to open a browser to OneDrive for Business, SharePoint or even an email application (Outlook) to share that file; the entire sharing experience is done through Office 2016. Awesome!

Plus moving you can see all the people who have access to the file and modify their permissions right there inside of Office 2016. You do not need to leave Office and navigate to OneDrive for Business or SharePoint to change the permissions making life really easy.

Plus if other people are co-authoring you will see their changes in real-time. Very cool.

clip_image002

Additionally in Office 2016 there is a new Share a Link option. Once you have saved your file to OneDrive for Business or SharePoint, you can press the Share button and get a link to the file right out of Office 2016. You can then provide that link out to a broader audience through whatever mechanism you want versus having to type in tons of names.

clip_image004

Another really simple option you have is in file explorer you can right click on a OneDrive for Business or SharePoint file and click the Share button. This will open the browser where right to the location so you can share that file.

clip_image006

Now let’s pivot the conversation over to some new awesome options available in Outlook 2016 that help you with sharing email file attachments.

First thing you should know about is new capability added to the Attach File button in Outlook 2016. You no longer need to dig around to find the file you were just editing. If the file is saved to OneDrive for Business or SharePoint, you will see that file immediately to easily attach it to your email. Even better, the list is cross device smart. So if you built the file on one device and then try to email it from a different device, you will see that file as a recent edited file for attachment. Frankly I love the ability of not having to go back to SharePoint through the browser to find the file; I can stay in Outlook 2016.

clip_image008

Now here is where things start to get really cool.

Once you have the file from OneDrive for Business or SharePoint attached, you have the ability to set the permissions of the file right there inside of Outlook 2016. Wow! Before I would have to go the location where the file was stored, set the permissions and then come back to Outlook and complete sending of the email. Now I just change the permissions right there on the spot as I am selecting the names of the people that I want to email the file to.

clip_image010

In conclusion these simple examples of new capabilities added to Office 2016 will change the way you share and collaborate with Office documents.

References

https://blogs.office.com/2015/10/05/share-with-the-click-of-a-button-in-office-2016/

https://blogs.office.com/2015/09/22/thenewoffice/

https://blogs.office.com/2015/11/09/attachments-in-outlook-2016-ready-for-collaboration/