Saturday, January 31, 2009

K2.net 2003 to K2 blackpearl Migration Utility Complete

It has been talked about for some time now that K2 would provide a migration tool from K2.net 2003 to K2 blackpearl. It was initially targeted for the RTM release of K2 blackpearl but there were some issues at time. Now it is good to go…

------------------

Dear K2 user:

The official release of the K2 blackpearl Migration Utility is here. The K2 blackpearl Migration Utility is used to transfer and manipulate data from existing K2.net 2003 databases to K2 blackpearl databases. This enables you to seamlessly start new and continue the execution of all currently running K2.net 2003 process instances on K2 blackpearl. It requires the K2 blackpearl 0807 release with the KB000370 update, both of which are available on the Customer Portal.

For installation and subsequent migration, we urge you to look at the documentation prior to attempting either! Unless you have already tested with pre-release versions of the K2 blackpearl Migration Utility, it is imperative that you evaluate your K2.net 2003 processes and test the migration in a non-production environment before attempting to migrate production servers.

> If you require K2.net 2003 archiving functionality, we recommend you do not migrate at this time

> If you make use of a user manager other than Active Director (ADUM), please contact support before you begin the migration process, even in a test environment

SUPPORT
Please use the customer portal to open support tickets and/or contact your local support offices to report any issues. Additionally, the K2 blackpearl public forum on K2 Underground is available for community-based discussions: http://k2underground.com/forums/default.aspx?GroupID=21. Note: K2 Underground is a community Web site and should not be used for production support issues or for logging bugs.

Thursday, January 29, 2009

When to use a SharePoint List?

It has been over a year since I have wanted to write this blog. It is a little late now but whatever; the topic still seems to come up. This blog struck a chord with me all of the sudden because I got my hands on the Microsoft Patterns and Practices SharePoint Guidance for November 2008. There are some good things in there, but much of it common sense sort of stuff.

This is what is in the SharePoint Guidance for November 2008 article when it comes to make a decision about using SharePoint Lists vs. a Database.

Benefits

Database

SharePoint list

Handles complex data relationships

Yes

No

Handles large numbers of items

Yes

No

Handles transactions

Yes

No

Is easy to use

No

Yes

Accommodates workflows

No

Yes

Includes a standard interface

No

Yes

Can easily add binary data

No

Yes

For the most part, they get it right however I think there are some things that are worth adding. My two cents is if I have any sort of custom application with custom code I usually start moving away from using SharePoint Lists and move towards SQL Server.

Here are two small cases studies. The first I had a client that needed simple application where a custom view of data was needed, the data was flat and non-relational, no reporting required, and we needed ability to approve and deny visibility of data. The solution entailed creating a Feature which deployed a content type, we created a custom list for that content type, we created some event receivers, we used the out of the box content approval for SharePoint lists and we created a web part for the custom view of data. By using a SharePoint list, we were able to get some free functionality like approving the visibility of data. In this case using a SharePoint List made tons of sense and worked very well.

The second case study did not work so well. We had to create a custom task management application. This task management application had several entities and some basic reporting requirements which needed to be exported from SharePoint:

  • We used SharePoint content types to model each data entity. Then we put all of the content types and data in the same list (effectively creating a three-dimensional table), pretty cool in concept.
  • We used event handlers to implement state management and relational rules between the data entities.
  • We wrote a custom data provider to get data out of SharePoint Lists into Reporting Services.
  • We over-overrode the list edit controls to we could implement more custom functionality.
  • We wrote several custom web parts that used CAML to query items out of the list since we were going go over the 2,000 item threshold. We had over 50,000 items in the list with zero performance problems.

In the end, we met every requirement and implemented on time and budget. The solution did not last long because it was a task management system where functionality needed to change in a rapid fashion and the reporting requirements grew and grew. The business users wanted to do all the reporting in Business Objects which was a tool they were very familiar with. Business Objects can use SQL but not SharePoint Lists so the solution did not scale. Looking back at the architecture of the solution I was disappointed in it because we had considered using SQL Server instead.

What we learned was highly relational data is not easily enforced using event handlers and if there are any sort of reporting requirements SharePoint Lists are not the way to go.

Plus I came out of this with some golden rules:

  • If I am writing custom web parts to retrieve and set data (unless I am getting some free SharePoint functionality by using a list item) I am going to go with SQL.
  • If I have relational data (other than simple lookups), going to SQL.
  • If I have reporting requirements, going to SQL.

Now based on several client experiences and emails I get CC'ed on for other SharePoint projects I felt it was necessary to go ahead and get this down. What I have also seen is lots of functional business users using SharePoint Lists as a way to replace MS Access or they think of it as web enabled Excel Spreadsheets (not to be confused with Excel Services). I have even seen designs from others where they start dropping XML documents into lists and start using that as a way to store enterprise data. I have even heard a request from someone on how to create an entity relationship diagram for list data they have. This is probably just a sample of bad uses of SharePoint Lists...

In the end my rule is simple, use SharePoint Lists for day-to-day collaboration sites. The point you start needing to build an application with custom code with web parts and business reporting stop right there; SharePoint Lists should probably not be used. Reporting seems to always be the deal breaker for a SharePoint List. Usually when building reports there is requirement for relational data. Do not fall into trap where you believe that if you use a SharePoint List you get free read, insert, update and delete screens. Your application will not scale over the long run.

There are several 3rd party companies that have sprung up created suites of tools for get around this. For instance there is Bamboo Solutions, KWiz, Coras Works, etc.

Saturday, January 24, 2009

Workflow SPListItem Out of Date

Error

I ran into this rather strange error a while back that I could not find much information on....

Microsoft.SharePoint.SPException: A file with the name Attachments/oooppp/Sdfkjsdfksdfnjfdsjksfdkjsdfkj fds jksdfkj sdfkj sdffkj fdskj.docx already exists. It was last modified by SHAREPOINT\system on 30 Dec 2008 15:31:28 -0500. ---> System.Runtime.InteropServices.COMException (0x81020067): A file with the name Attachments/oooppp/Sdfkjsdfksdfnjfdsjksfdkjsdfkj fds jksdfkj sdfkj sdffkj fdskj.docx already exists. It was last modified by SHAREPOINT\system on 30 Dec 2008 15:31:28 -0500. at Microsoft.SharePoint.Library.SPRequestInternalClass.PutFile(String bstrUrl, String bstrWebRelativeUrl, Object varFile, PutFileOpt PutFileOpt, String bstrCreatedBy, String bstrModifiedBy, Int32 iCreatedByID, Int32 iModifiedByID, Object varTimeCreated, Object varTimeLastModified, Object varProperties, String bstrCheckinComment, UInt32& pdwVirusCheckStatus, String& pVirusCheckMessage) at Microsoft.SharePoint.Library.SPRequest.PutFile(String bstrUrl, String bstrWebRelativeUrl, Object varFile, PutFileOpt PutFileOpt, String bstrCreatedBy, String bstrModifiedBy, Int32 iCreatedByID, Int32 iModifiedByID, Object varTimeCreated, Object varTimeLastModified, Object varProperties, String bstrCheckinComment, UInt32& pdwVirusCheckStatus, String& pVirusCheckMessage) --- End of inner exception stack trace --- at Microsoft.SharePoint.Library.SPRequest.PutFile(String bstrUrl, String bstrWebRelativeUrl, Object varFile, PutFileOpt PutFileOpt, String bstrCreatedBy, String bstrModifiedBy, Int32 iCreatedByID, Int32 iModifiedByID, Object varTimeCreated, Object varTimeLastModified, Object varProperties, String bstrCheckinComment, UInt32& pdwVirusCheckStatus, String& pVirusCheckMessage) at Microsoft.SharePoint.SPFileCollection.AddInternal(String urlOfFile, Object file, PutFileOpt fileOpt, String createdBy, String modifiedBy, Int32 createdByID, Int32 modifiedByID, DateTime timeCreated, DateTime timeLastModified, Object varProperties, String checkInComment, SPVirusCheckStatus& virusCheckStatus, String& virusCheckMessage) at Microsoft.SharePoint.SPFileCollection.Add(String urlOfFile, Byte[] file, Boolean overwrite, String checkInComment, Boolean checkRequiredFields, SPVirusCheckStatus& virusCheckStatus, String& virusCheckMessage) at Microsoft.SharePoint.SPFileCollection.Add(String urlOfFile, Byte[] file, Boolean overwrite, String checkInComment, Boolean checkRequiredFields) at Microsoft.SharePoint.SPFileCollection.Add(String urlOfFile, Byte[] file) at Portal.Contracts.WF.ContractApproval.CopyArchiveAttachments() at Portal.Contracts.WF.ContractApproval.onCreateAmendmentAttachmentFolder(Object sender, EventArgs e) at System.Workflow.ComponentModel.Activity.RaiseEvent(DependencyProperty dependencyEvent, Object sender, EventArgs e) at System.Workflow.Activities.CodeActivity.Execute(ActivityExecutionContext executionContext) at System.Workflow.ComponentModel.ActivityExecutor`1.Execute(T activity, ActivityExecutionContext executionContext) at System.Workflow.ComponentModel.ActivityExecutor`1.Execute(Activity activity, ActivityExecutionContext executionContext) at System.Workflow.ComponentModel.ActivityExecutorOperation.Run(IWorkflowCoreRuntime workflowCoreRuntime) at System.Workflow.Runtime.Scheduler.Run()

Cause

As usual the error was pretty perplexing until I dug deeper into what I was doing.

The cause has to do with the SPFile and the SPListItem getting out of sync with each other. In my MOSS workflows I move items between libraries as well as modifying XML in InfoPath form instances. The issues is not so much the initial action I take, any second action to the workflow SPListItem will cause the error.

The error was spread across several places in my workflow; I will try to boil it down for you here:

  • I get the SPListItem, which in this case is an InfoPath form.
  • I get the XML string of the InfoPath form from the SPListItem, deserialize it into a class, do some updates, serialize it back into XML and push it back into the SPListItem.
  • Then I would modify some of the permissions to the SPListItem. This is where the error would occur.

Getting this error was pretty perplexing at first. I my InfoPath form utility (which I will be posting shortly), I was getting the XML string, modifying it, and then saving it back into the binary. Below is some extracted code where I was getting the workflow item and pushing in a fileStream with the modified XML.

SPListItem infoPathItem = WorkflowProperties.Item;
infoPathItem.File.SaveBinary(fileStream);
infoPathItem.File.Update();

Then later on in a different code event, I had some more code where I subsequently called:

WorkflowProperties.Item.Update(); 

The moment I call the second update, the error would come up.

Resolution

After much research I found out the following:

  1. This error would occur whether I was doing this in WF or in some web part. Basically changing the SPListItem's File.Update() does not sync up the entire SPListItem with SharePoint. So when the second update is called, SharePoint scoffs at you saying the object instance you have is out of date with the one on the server. Valid complaint too!
  2. WorkflowProperties.Item is only loaded when the workflow rehydrates. Even though I may reference it many times, across many code events, the WorkflowProperties.Item will only load up once. Let me explain rehydrating (very similar to K2 or BizTalk). What happens is when a WF instances goes into a wait state, like waiting for a TaskChanged event to fire, WF will persist itself to the SharePoint database. When the TaskChanged event fires, the WF instance will rehydrate based on the data that was saved. At that point, the WorkflowProperties.Item will be loaded up. It will not be loaded up every time I reference WorkflowProperties.Item.

My resolution is to add a simple property to my WF class. What it will do is ensure that I always load up the SPListItem every time I need it.


private SPListItem WorkflowItem
{
get
{
SPDocumentLibrary library = (SPDocumentLibrary)WorkflowProperties.Web.Lists[WorkflowProperties.ListId];

return library.GetItemById(WorkflowProperties.ItemId);
}
}

References

Content Database Restore File Not Found

We recently experienced a rather weird experience when moving some SharePoint content databases. We are not using stsadmn. We have several environments, all the same, and we just wanted to move the content DB from one environment to another. We have done this several times with no error.

This time around when we did it, we were getting File Not Found errors when we try to go to the site. We went into Central Admin and the Content Database was listed on the Manage Content Databases page, however if you went to view the Site Collection list no information was listed. On the Site Collection page you should see things such as a URL, Title, some other stuff and a Database Name. All of this was blank. There were no exceptions in the Event Log on the box and no errors either in the SharePoint log.

We did some searching and could not find anything. Andy on my team found this posting. It had nothing to do with this error however we decided to give it a try. It does not actually delete the databases, it just removes the association between the MOSS site and the database.

Stsadm -o deletecontentdb -url [Site URL] -databasename [database name]

Stsadm -o addcontentdb -url [Site URL] -databasename [database name]

Once we did this, everything started running again.

References:

Friday, January 23, 2009

SharePoint PerformancePoint Services

Some big news went out today around Microsoft's PerformancePoint Server which is part of their BI solution set. In their road map (read here), Microsoft is saying that they plan to finish PerformancePoint Server 2007 "Service Pack 3" in mid 2009 and then Microsoft will stop building it as a separate server as they are rolling it into the SharePoint platform!

Basically they will be creating the PerformancePoint service which will complement Excel Services, BDC and other BI related services in SharePoint.

I think this again demonstrates how Microsoft is really standing behind MOSS and making significant investments into it. We have seen them use MOSS to make Office products available over MOSS like Excel and InfoPath Services. Is the next thing Access Services? Maybe even rolling SQL Reporting Services over – that actually makes a bunch of sense? Seeing announcements like this just continue to support my stance that SharePoint is the delivery platform for .NET applications for the next few years; I am not saying that custom ASP.net will disappear either. However with all the stuff you get with SharePoint, I have a really tough time anymore building stuff web applications from scratch….

Thursday, January 22, 2009

Moving SharePoint My Links between SSPs

Background

Well I have had this ongoing annoying issue with a Shared Service Provider (SSP) that I described in this old posting. The issue was an AD account was removed, it had permission set to in the BDC, we were getting an error trying to remove it because if we did not the BDC index would fail. Anyways, the solution was either to buy DeliverPoint to delete this one dead account of the SSP or do something else. Our solution was to recreate the SSP which I discussed in this post. Well to make a long story, longer, our solution did not entail backing up and restoring the SSP because the error would still be there. So our solution was to rebuild the SSP and them move over it. This is how I got to here.

My Links Issue

Normally My Links in SharePoint was not a high priority item. However we found out after we had moved over to the new SSP that users had thousands of My Links set up. In this post, I discussed creating a separate web application for the SSP site and we moved over to a new SSP. One unexpected result was all of the My Links were now missing.

This was particularly confusing because when managing My Links, the user is redirected to My Sites URL for the SSP. We are using My Sites, I had thought this data was stored as part of the My Sites content database. Wrong – not the case at all. All of the My Links are stored in the SSP database. So the issue was how do we get the URLs out of the old SSP database and into the new one?

Resolution

We considered many options, but the best option that was going to move the data between the databases. So we restored the old SSP and found that the URL were stored in UserLinks table. In the UserLinks table, there is a column called RecordID. The RecordID column refers to the user account that the URL is for. Going to the UserProfileValue table, we say that this table stored the information that is retrieved from the Profile Search Service that is in the SSP.

Now the interesting thing is you cannot just insert all of the records in UserLinks table from one SSP database to another. The reason why is because the RecordID will be different on in each SSP database. This is because the Profile Search Service on the old SSP DB indexed different accounts over a year ago versus the new SSP with the fresh brand new index of user profiles we had in.

The following query will show you a report of how to reconcile the RecordIDs across the database.

SELECT UPV1.RecordID, UPV1.PropertyVal, UPV2.RecordID, UPV2.PropertyVal
FROM SharedServices1_DB.dbo.UserProfileValue as UPV1, SharedServices2_DB.dbo.UserProfileValue as UPV2
WHERE UPV1.PropertyID = 3 AND UPV1.PropertyVal = UPV2.PropertyVal

To resolve the issue, we ran this SQL Script to move the data over from one SSP database to another. One ramification is that if an account was removed between the creation of the old and new SSPs, the URLs from that removed account will not be copied over to the new SSP because the profile service search will not find the account.

The following SQL statement shows how to move the data over.

INSERT INTO SharedServices2_DB.dbo.UserLinks(RecordID, Title, GroupType, GroupTitle, URL, ContentClass, PolicyID, ItemSecurity)
SELECT UPV2.RecordID, UL1.Title, UL1.GroupType, UL1.GroupTitle, UL1.URL, UL1.ContentClass, UL1.PolicyID, UL1.ItemSecurity
FROM SharedServices1_DB.dbo.UserProfileValue as UPV1, SharedServices1_DB.dbo.UserLinks as UL1, SharedServices2_DB.dbo.UserProfileValue as UPV2
WHERE UPV1.PropertyID = 3 AND UPV1.PropertyVal = UPV2.PropertyVal AND UPV1.RecordID = UL1.RecordID

NOTE – Microsoft does not recommend making changes to data in the database. In this case, since it was a straight insert into an empty table with URLS, we were ok with moving forward…

Wednesday, January 21, 2009

K2 blackpearl Professional Now Available

The Professional K2 blackpearl Wrox book is now available for purchase (ISBN 978-0-470-29305-8). I just received my ten copies and I am super excited it showed up. Here are some links:

I highly recommend getting this if you have K2 or looking for more information about it. You will learn best practices, how to approach building workflow solutions, best practices for K2, detailed architecture, administration, reporting and advanced topics. This was written by both consultants and engineers that have successfully used K2 to deliver workflow solutions.

Tuesday, January 6, 2009

SSP Administration Site Host Configuration

This is probably more if a minor rant than anything else. I had an issue where we needed to move a site from one SSP to another SSP. The reason had to do with this old posting (finally got around to fixing this). Our solution right now is to recreate the SSP.

If you go to Central Admin >> Application Management >> Manage this Farm's Shared Services, you will see you have the ability to change the association for web application from one SSP to another SSP. However, the catch is that if the web application is tagged as the "Administration site host" you cannot move the web application.

One option would be to create a new SSP, then create a new web application and then move the site collection from old web application to the new one. Not like that is hard however I started thinking I really should not have a dependency between the SSP admin web site (//ssp/admin) and my main site collection. I think the reason why most people get into this situation is because when they read most install instructions for MOSS they:

  1. Create a web application (in many cases, if this is a fresh install they do it right on port 80).
  2. Create a new SSP for the web application.
  3. Create a site collection for the new web application.

The result is that both their main site collection and SSP Admin website are now hosted in the same web application.

What I am going to do moving forward is:

  1. Create a web application (not using port 80 and plan using this for only the SSP admin site).
  2. Create a new SSP for the web application.
  3. Create another web application (this may be on port 80).
  4. Create a site collection in the second section web application.

Notice that there is no site collection created for the first web application and its only purpose is for hosting the SSP admin website.

If your environment is like above, and you want to get your core site collection into a different Web Application without doing the stsadm stuff, it is pretty simple (this only works if you have a single existing SSP):

  1. Create a web application.
  2. Create a new SSP for the new web application.
  3. Then go to "Manage this Farm's Shared Services" and you will see that you have two SSPs. The new one will have the new web application as the "Administration site host".
  4. Reconfigure the new SSP to be the same as the old SSP.
  5. WARNING – Take note of all custom configurations you have to the old SSP before continuing. You can also backup and restore the SSP using stsadm (http://technet.microsoft.com/en-us/library/cc512095.aspx). I am not responsible if you did not do this before continuing to the next step. You really needed to do this anyways because you are moving to the new SSP.
  6. After taking note of all custom configurations to your old SSP; delete the old SSP.

The result will move any web applications from the old SSP to the new SSP and your old web application will no longer be the "Administration site host". As well, if the old SSP was the Default SSP, the new SSP will become the Default.

Moving forward, you now have the ability to move your web applications to different SSPs in Central Admin.

January 2009 User Group

The infamous Bob Maggio will be presenting K2 blackpearl debugging and troubleshooting on January 13, 11am-1pm central time. Information to attend remotely is below!

----------

Phillip Knight from Merit Energy will be hosting the K2 user group meetings at Merit Energy, located at 13727 Noel Road, Fourth Floor Rodessa Conference room, Tower 2, Dallas, Texas 75240. Parking information is included in the linked map below. Remote attendance information is included at the bottom of this message. PLEASE NOTE: Conference room has changed for this meeting.

Link to map: http://www.meritenergy.com/content/MeritMap.pdf. Reminder: Merit Energy is on the 5th floor, but the meeting will be held in a 2nd floor conference room. Once off the elevator, go to the reception area and we will bring you back to the conference room.

If you haven't already done so, please RSVP to me via email
whether you are attending via live meeting or if you will be attending in person (so that we can plan for the number of people to order food for).

Check out the K2 Underground site and our user group at http://k2underground.com/k2/InterestGroupHome.aspx?IntGroupID=11. We are posting webexes/live meetings from our meetings at this site.

02/10/2009 11am – 1pm
03/10/2009 11am – 1pm
04/14/2009 11am – 1pm
5/12/2009 11am – 1pm
06/9/2009 11am – 1pm

Meeting Agenda:
11-11:15 Networking/Refreshments
11:15-11:30 Announcements/Intros of New people
11:30-11:45 Tips & Tricks
11:45-12:45 Technical Presentation
12:45-1:00 Meeting Wrapup

The Announcements section of the meeting will include any information regarding K2 upcoming events and user group events as well as brief introductions of our presenter and refreshment provider.

The Tips & Tricks Presentation is when we as members can pose questions to each other on projects that we are working on and having difficulty with. It is also a time when if we have learned something that we feel will be helpful to others, we can share it with the group. Bring yours to share/ask.

Meeting Presentation & Company & Sponsor:

Bob Maggio from K2 will be presenting on debugging and troubleshooting techniques in K2 BlackPearl. This will be a great presentation for those of us who are new to K2 BlackPearl development and those of us that are just new to K2 BlackPearl.

K2 blackpoint, a subset of K2 blackpearl features, provides unparalleled capabilities and affordability. It also offers an upgrade path so that organizations can grow their investment and add complexity over time, if needed.

For more information, go to http://www.blackpoint.k2.com.

The K2 platform is for delivering process-driven applications that improve business efficiency. Visual tools make it easy for anyone to assemble reusable objects into applications that use workflow and line-of-business information.

K2-based solutions are deployed by a growing number of the global Fortune 100. K2 is a division of SourceCode Technology Holdings, Inc. based in Redmond, Washington, and has offices all over the world.

For more information, contact Joe Bocardo at joeb@k2.com.

Meeting Presenter:

Bob Maggio

Bob Maggio lives in Fort Mill, SC and has been part of the North American K2 Professional Services team since 2005. Before K2 he was a member of various production and application development teams focusing on implementation of Microsoft technologies.

For Virtual Attendees:

Note: please keep your phone on mute until you are ready to speak.

Audio Information

Telephone conferencing
Choose one of the following:

  • Start Live Meeting client, and then in Voice & Video pane under Join Audio options, click Call Me. The conferencing service will call you at the number you specify. (Recommended)
  • Use the information below to connect:
    Toll-free: +1 (888) 296-6500

    Toll: +1 (913) 227-1219

    Participant code: 447307

First Time Users:

To save time before the meeting, check your system to make sure it is ready to use Microsoft Office Live Meeting.
Troubleshooting
Unable to join the meeting? Follow these steps:

Copy this address and paste it into your web browser:

  1. https://www.livemeeting.com/cc/scna/join?id=P54SGR&role=attend&pw=pnc
  2. Copy and paste the required information:
    Meeting ID: P54SGR

    Entry Code: pnc#\5C

    Location: https://www119.livemeeting.com/cc/scna

Thursday, January 1, 2009

WF MOSS Human Workflow Part 3 – InfoPath Setup


Introduction

Sorry for the late release of this part three of this series. A new child birth, holidays and work just threw my schedule off…


This is the third part of a continuing series on how to build human workflow with the Windows Workflow Foundation, MOSS and InfoPath. Up to this point I have discussed some design considerations and assumptions you should make before building a workflow in Visual Studio. Then I also had a deep discussion on how create the Visual Studio solution and assumptions when creating it.


In this posting, I am going to show you all the things that you need to do to create the InfoPath forms that will be used for this process. The nice thing about using InfoPath is that you can mock-up the forms, use them to help elicit requirements from users and the form will be re-usable when you move to construction.


When to Use InfoPath


I am a broken record on this topic on when to use InfoPath or not. InfoPath can be a great tool if you recognize its limitations. Please read this posting for more information about the assumptions and considerations you should make before using InfoPath. I always believe that if I can avoid doing .NET managed code, the data is relatively flat and you do not require a complex User Interface InfoPath is great. I really like InfoPath forms for simple forms that gather data, some decisions are made on that data and then it is persisted off to a database somewhere. Data validation is extremely easy and it is a no brainer to wire up a web service to get or set data.


InfoPath Schema Best Practices


I am a big believer in keeping the schema of your InfoPath form clean. You could go as far as create your schema externally and then import into the InfoPath form but it can be annoying to deal with at times; especially if you have to re-import the schema every time you want to add a field to the form.


Before building your InfoPath form, I would suggest adding the following three groups to the root of the schema. In the Main datasource add the following three groups: Business, Workflow, and InfoPath.


  • First the Business group has a generic name. I recommend naming something like PurchaseOrder, TravelRequest, etc. All data fields associated to the form itself should be located here.
  • Second the Workflow group will be used to store all data that is associated to the windows workflow. There will be pieces of data that you may want to have in the form which has nothing to do with the business data; they should be placed here.
  • Third is the InfoPath group which is used to store any fields that nothing to do with either business or the workflow. Rather they are used for functionality of the InfoPath form. When doing InfoPath forms in the past I have had situations where I had to add checkboxes, radio buttons, etc. to improve the user experience. The result of which would litter my schema with data elements. This why I recommend creating this group. InfoPath does not use a control based event model like ASP.net or WinForms. Events are risen from the XML document based on when a value changes. This results in the creation of data field; many view this as a limitation.

Even if I was not building a MOSS WF workflow, I would still structure my schema in a similar manner. Nothing is more frustrating that see an InfoPath form with a schema that is not well thought out.


The Forms in the Solution


In this solution there are four forms: request, association, initiation and task forms. In the first posting of this series, I discussed how the forms interact with each other and many design assumptions. The most important is that the request form is different that the association, initiation and task forms. The request form should be treated just like any piece of generic content in MOSS while the association, initiation and task forms are used for the business process for that piece of content.


When building the forms themselves, there is really nothing terribly special that has to be done. I usually like to try to get the forms built up minimally before I start trying to build a WF workflow and getting everything all wired up. As such, that is what you will see in the rest of this blog.


Request Form


You may recall in the second posting I created a solution for this workflow. One of the projects was called WFDistillery.MyProcess.Form.Request which is the form that the user will submit. For this blog series, I am going to keep the InfoPath form simple; I really want to focus on the best practices of how to do workflow in general. We will call this a Software Request Form.


Here are a couple of tasks that you will need to knock out (for all of the forms):


  • Tools >> Form Options >> Compatibility >> and allow the form to be opened in a browser.
  • Since I am building these InfoPath forms within Visual Studio, they will have .net managed code. Because of that you need to make sure that you go to Tools >> Form Options >> Security and Trust and give the form Full Trust. You will need to assign a certificate. Since the form will be running on the server side as a web enabled form, you can get by with using a self-signed certificate. Moving forward, you will need to deploy this form through SharePoint Central Administration or read this posting to deploy the form as a Feature. I will go into more details later.

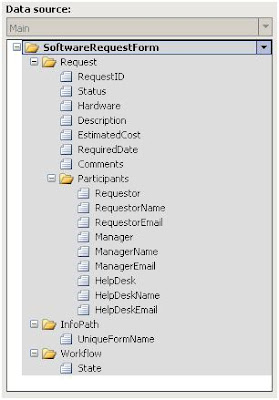
Next I need created the main data source of the form. Using the recommendation above, the following is the main data source for the form. Pretty simple:

  • Request section has fields associated to the software request only. Note that Status field has default value of "Not Submitted".
  • The InfoPath section has fields that are used for the InfoPath purposes only. Right now it only has a field called UniqueFormName that will be populated with a GUID which is explained below.
  • The Workflow section has a single state field right now. This will be updated by the workflow to reflect the state in which the InfoPath form is within the workflow. The State field has a default value of "Not Started".
I am going to skip much of the presentation of the form and business rules that can be enforced with the schema like making fields required or apply regular expressions to them.

Now the next thing I need to do is get the Request Form ready for a submission. What I want to achieve is that when the form is submitted to a Form Library, that the form will be saved uniquely in the Form Library and the form will be closed on submission. To achieve this I need to add some .net managed code to generate a GUID.


We need to add the code, so in Visual Studio open the manifest.xsf file, then in the main menu select Insert >> Loading Event. An event handler will be generated. In here, I simply check the Status and State fields before generating a GUID. I set it into the UniqueFormName field which is in the InfoPath group.

public void FormEvents_Loading(object sender, LoadingEventArgs e)
{
XPathNavigator status = this.MainDataSource.CreateNavigator().SelectSingleNode(
"/my:SoftwareRequestForm/my:Request/my:Status", this.NamespaceManager);

XPathNavigator state = this.MainDataSource.CreateNavigator().SelectSingleNode(
"/my:SoftwareRequestForm/my:Workflow/my:State", this.NamespaceManager);

if (status.Value == "Not Submitted" && state.Value == "Not Started")
{
//Generate guid which will be used in the form name.
XPathNavigator formName = this.MainDataSource.CreateNavigator().SelectSingleNode(
"/my:SoftwareRequestForm/my:InfoPath/my:UniqueFormName", this.NamespaceManager);
formName.SetValue(Guid.NewGuid().ToString());
}
}

The last step I have to complete is set up the form for submission. To do this, you will need to create a form library. Later you can reconfigure the form to submit to the correct place in production. To set this up:

  • Create a form library in your SharePoint development environment.
  • Go to Tools >> Form Submit Options.
  • Check Allow Users to Submit the form.
  • Select to send the form to a SharePoint document library.
  • Click the Add button next to the data connection dropdown. This will launch the Data Connect Wizard. Put in the URL to form library you have created. Then for the File name, select the UniqueFormName field that was populated in during the form load. This will ensure the name for the form is unique. Finish the Data Connection Wizard.
  • Click the Advanced button and select to close the form after submission. When the workflow is configured with the form, it will be configured to start on submission of a new item into the form library. So we want to close the form immediately because the process has now begun.

At this point, the Request form is ready and now we need to configure the other forms for the workflow.

Association Form


A couple of tasks that you will need to knock out are:


  • Tools >> Form Options >> Compatibility >> and allow the form to be opened in a browser.
  • Tools >> Form Options >> Security and Trust and give the form Full Trust.

I am not going to do anything with this form for this process however I have it part of the solution as a placeholder. Once you have done this, you are pretty much good to go.


Remember, the association and initiation forms data sources need to have the same schema. I think this is pretty silly and does not make sense because you will need to do different things with each form. I have complained about this before in this post. Also refer to the first posting for more detailed information about the association form.


Even though I plan to no use the association form, that fact that I have it configured means that it will be shown to me when I associate the workflow to a list in SharePoint. At minimum I need to add a submit button. Unlike the request InfoPath form, this InfoPath form will be displayed within the SharePoint template and the default submit, save, save as and close buttons are not available. I need to add a submit button so that workflow can be associated. To do this:


  • Add a button to the form and change the label to "Associate".
  • Go to the button Rules.
  • Create a new Rule.
  • Add a new Submit Action.
  • In the Data Connection wizard, select Submit data, then select "to the hosting environment, such as an ASP.net page or a hosting application". The hosting application is SharePoint! Then finish the wizard.
  • Add a second Action to close the form.

Now you are done with the association form.


Initiation Form


This is the form that will be used when the workflow is first initiated. However, the user will never see this form given I plan to only initiate the workflow when the form is submitted into the form library. The initiation form will be shown if a user can manually start the workflow by using the action dropdown. The initiation form is really handy if you have a word document, excel spreadsheet, a list item, etc. that you are building a workflow for. Even though I plan to not use it, I will wire it up because I may want to allow the user to manually start the workflow down the road. The user experience would be the user would have to open the request form, enter all the required data, save the request form to the form library, and then the user would use the workflow actions to initiate it.


You need to knock out the same tasks as you did with the association form:


  • Tools >> Form Options >> Compatibility >> and allow the form to be opened in a browser.
  • Tools >> Form Options >> Security and Trust and give the form Full Trust.
  • As well, you will need to add an Initiate button using the same steps as described in the association from section.

Task Form


This is the task form that will be shown to user.


Again go ahead and knock the following out:


  • Tools >> Form Options >> Compatibility >> and allow the form to be opened in a browser.
  • Tools >> Form Options >> Security and Trust and give the form Full Trust.
  • Add a submit button as described earlier.

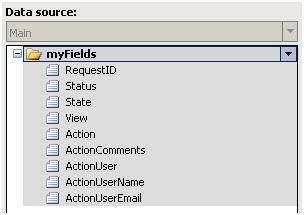
Now we need to add some data fields to this form. I added the following data fields to the form.


Notes:

  • The RequestID is the primary key from the database I plan to be using down the road. Do plan to load in some collections of data from the database into the task form so I will need that.
  • The Status and State fields will be populated by the workflow. I will be showing you how to retrieve data from the InfoPath form and then set that data into the task form.
  • The view field will be populated by the workflow to show the correct view to the user based on the state of the workflow. The View field is my way of not using many task forms. In the first posting I discussed some reasons on why I do not like to have many InfoPath forms. It is a lot simpler to add many views to the InfoPath form and then in a loading event of InfoPath switch to the correct view.
  • All of the action fields are fields that will be used to capture a decision.

Notice that I did not much emphasis on putting all the data fields from the main request form into the task form. Later in this series, I will show how to add a link into the task InfoPath form that will open the request InfoPath form which has all the detailed information about the request.

I will have to create a separate blog entry around getting the task form completely wired up. Specifically it will focus on providing the correct list of actions for a user based on the state and capturing "who" took an action. You may not always know who because you may assign the task to a group of users.


The last thing I want to go over is the how to populate the fields in the task InfoPath form. This is actually pretty well documented, so I will breeze over this.

  • Add a file called "ItemMetadata.xml" to the Task0 project in the root. It is important to make sure that the name is "ItemMetadata.xml" and not anything else.
  • In the file, remove everything from it and add the following. Note that fields are prefixed with "ows_".
<z:row xmlns:z="#RowsetSchema" ows_RequestID="" ows_State=""
ows_Status="" ows_View="" ows_Action="" ows_ActionComments=""
ows_ActionUser="" ows_ActionUserName="" ows_ActionUserEmail=""
/>
  • Next, we need to add this xml document as a data source for the task form. Open the Data Connection wizard >> add a new data connection to receive data >> select from an XML document >> browse to ItemMetadata.xml >> select "Include the data as a resource file in the form template or template part" >> make sure the "Automatically retrieve data when form is opened" is checked >> finish the wizard.
  • Now double click on the RequestID field in the main data source. In the properties window, go to the Default Value section >> click the fx button >> click Insert Field or Group >> select the ItemMetadata secondary data source >> select the RequestID field. Now complete this for the all of the other fields.

So you may be wondering, what is this all about. Well in your workflow code we will want to set fields like the RequestID in the task form or get it back out link in the Action field. For instance we will write code like this:

taskProperties.ExtendedProperties["RequestID"] = _requestID;


Or


string action = taskProperties.ExtendedProperties["Action"];


Basically the SharePoint Workflow Infrastructure will take values that have been set into the ExtendedProperties HastTable and load in and out ItemMetadata.xml document that resides in the InfoPath form. This is only way to push data into an out of the task form without have to create data services to be used in the InfoPath form.

--------------------------


There is an important note/rant I would like to make. The data in the InfoPath task form cannot be hierarchical, meaning the data needs to be flat so that you can access the fields of the InfoPath form within the workflow code. Here is an example many are familiar with.

string foo = taskProperties.ExtendedProperties["Foo"];


The ExtendedProperties HastTable property has the fields that you define in the main data source of the task InfoPath form. You do not have the ability to navigate deeper nor access data in a repeating nodes. I have found this to be a huge limitation of task forms. The only way around it to:


  • Use web services to push data in and out of the task form. Then in the workflow access the data again through those same data services.
  • Only use the task form to make a decision and capture as much complex data in the request form.

The second approach is usually what I strive for.


Both the association and initiation forms do not suffer from this issue. First because the data is always a get, because you will only ever see the association and initiation forms once in the workflows lifecycle. Second, there is a convenient properties called AssociationData and InitiationData on the SPWorkflowActivationProperties class. These will give the entire XML string of data from these two forms.


--------------------------


What Is Next


Next I plan to go over the creation of the state workflow. Then we will start getting into the fun stuff of getting data in and out of these forms, adding security to items, moving documents and attachments around, deploying the solution and adding all the little things that improve usability. Right now, I need to finish up that foundation so that you can do all of that.